

Exploring C++20 coroutines for embedded and bare-metal development on RISC-V platforms
Can C++20 coroutines build efficient, real-time embedded applications on bare-metal RISC-V platforms — no RTOS required?
November 24, 2024 (updated: December 27, 2025) (C++,baremetal,coroutines)
Introduction
This post is about using C++ coroutines to suspend and resume functions in real time. The objective is a simple way of building real time tasks using only C++, without the need for an RTOS or operating system kernel.
Coroutines are functions that can be suspended and resumed, using the keywords co_await, co_yield and
co_return. The C++20 standard introduced coroutines to the language.
C++ standardized the keywords and type concepts for coroutines, but it did not standardize a runtime1. The lack of a standard runtime has made them hard to use them “out of the box”, but the implementation of coroutines is very adaptable to different use cases.
Here I use a simple runtime implementing C++20
coroutines on bare metal (no operating system) for RISC-V, using the
co_await keyword. This is done by passing the real time scheduler and resume time condition as the argument to the asynchronous wait operator.
The runtime is described in detail in this post.
This story is also published on Medium.
Why coroutines?
I’m interested in coroutines for the follow benefits:
- Event driven asynchronous functions can be written using a control/data flow in a single body of code that can be easy to understand.
- Code is portable so that the same code can be tested on development OS and target systems.
- Resource efficiency, in terms of memory usage (stack and heap) and CPU cycle usage.
A software timer example
This article will build a simple software timer example. The function has a loop that pauses for several micro seconds before iterating again. While the loop is paused the control flow returns to the caller function.
A simple coroutines task
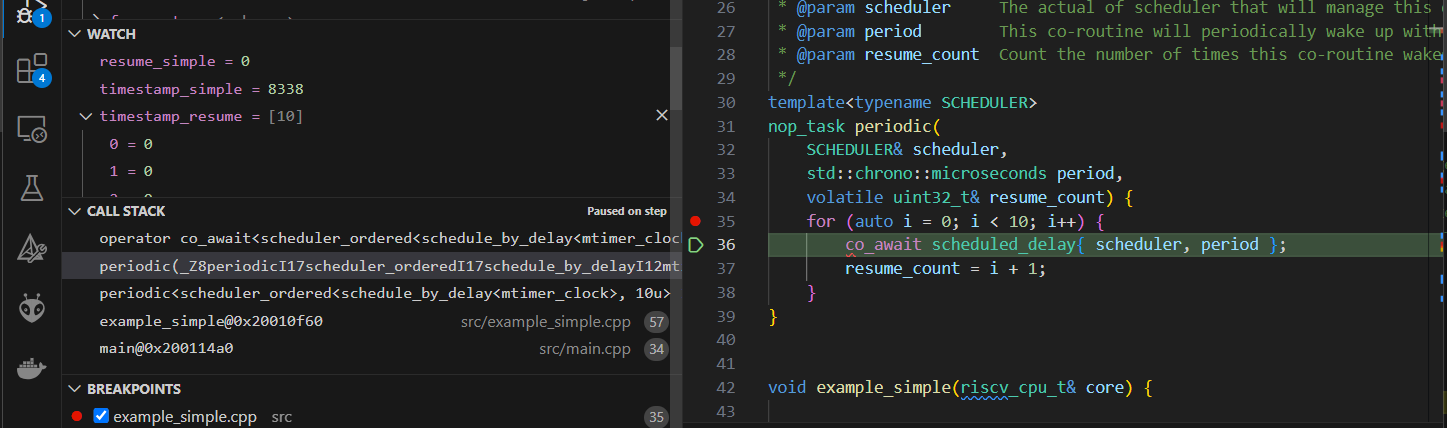
A simple task periodic is defined in example_simple.cpp.
It takes scheduler, period and resume_count as arguments and asynchronously waits period microseconds for 10 iterations, updating the resume_count value each iteration.
The scheduler passed as an argument is not strictly necessary for C++ coroutines, but is used to make the ownership of the context of each task explicit. (It could be possible to use a global scheduler, such as when implementing via OS threads.)
The task returns nop_task. This is a special structure that is linked to the coroutines implementation. In this case a “nop task” refers to a task that does not return a value via co_return.
template<typename SCHEDULER>
nop_task periodic(
    SCHEDULER& scheduler,
    std::chrono::microseconds period,
    volatile uint32_t& resume_count) {
    driver::timer<> mtimer;
    for (auto i = 0; i < 10; i++) {
        co_await scheduled_delay{ scheduler, period };
        *timestamp_resume[resume_count] = mtimer.get_time<driver::timer<>::timer_ticks>().count();
        resume_count = i + 1;
    }
    co_return; // Not strictly needed
}
The function has the following behavior:
- Take
periodas a parameter in microseconds. - Keep track of the number of iteraton via the
resume_countcounter. - Iterate 10 times.
- For each iteration,
- wait
periodusing theco_awaitkeyword. - then increment
resume_count.
- wait
- Use
co_returnto exit the coroutines.
The following sequence diagram shows an abstract coroutine execution where an abstracted OS exists to handle the scheduling of process execution. (PlantUML source)

Calling the simple coroutine task
The example_simple() function in example_simple.cpp calls the periodic function once, with 100ms as the period value.
The scheduler_delay<mtimer_clock> is a scheduler class that will manage the software timer to wake each coroutine at the appropriate time, using our RISC-V machine mode timer driver mtimer.
    driver::timer<> mtimer;
    // Class to manage timer coroutines
    scheduler_delay<mtimer_clock> scheduler;
    // Run two concurrent loops. The first loop will run concurrently to the second loop.
    auto t0 = periodic(scheduler, 100ms, resume_simple);
Resuming the coroutine tasks
For this example the scheduler is an object instantiated in the example_simple() function. It needs to be called explicitly to calculate when each coroutine needs to be woken and resumed. This is a convention of the runtime for this example, and not a required convention for C++ coroutines.
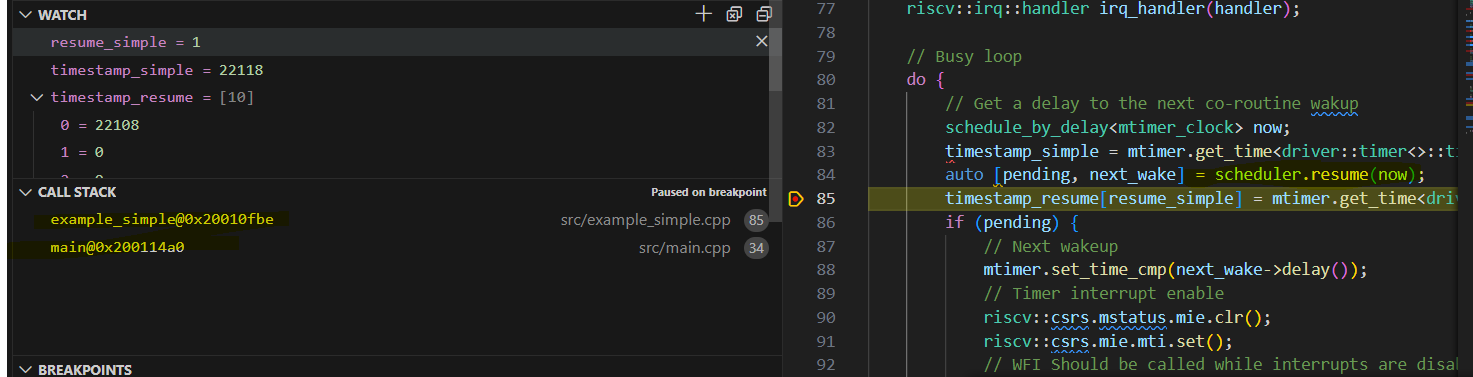
The tasks are resumed in the WFI busy loop of example_Simple() when scheduler.update() is called. However, as the scheduler is just a C++ class, this can be called from other locations, such as a timer interrupt handler.
    do {
        // Get a delay to the next coroutines wake up
        schedule_by_delay<mtimer_clock> now;
        auto [pending, next_wake] = scheduler.update(now);
        if (pending) {
            // Next wakeup
            mtimer.set_time_cmp(next_wake->delay());
            // Timer interrupt enable
            riscv::csrs.mstatus.mie.clr();
            riscv::csrs.mie.mti.set();
            // WFI Should be called while interrupts are disabled
            // to ensure interrupt enable and WFI is atomic.
            core.wfi();
        ]
    } while(true)
For example as the IRQ handler in this example is a lambda function, we could also capture the scheduler and run the timer coroutine in the IRQ handler.
    static const auto handler = [&](void) {
        ...
        schedule_by_delay<mtimer_clock> now;
        auto [pending, next_wake] = scheduler.update(now);
    };
Building and running with Platform IO
The example can be built and run using Platform IO. The default RISC-V platforms use an old version of GCC that does not support C++20, so a custom virtual platform configured to use xPack 12.2.0-3 riscv-none-elf-gcc and run on QEMU has been created in platformio/platforms/virt_riscv.
build_flags =
    -std=c++20
    -O2
    -g
    -Wall
    -ffunction-sections
    -fcoroutines
    -fno-exceptions
    -fno-rtti
    -fno-nonansi-builtins
    -fno-use-cxa-atexit
    -fno-threadsafe-statics
    -nostartfiles
    -Wl,-Map,c-hardware-access-riscv.map
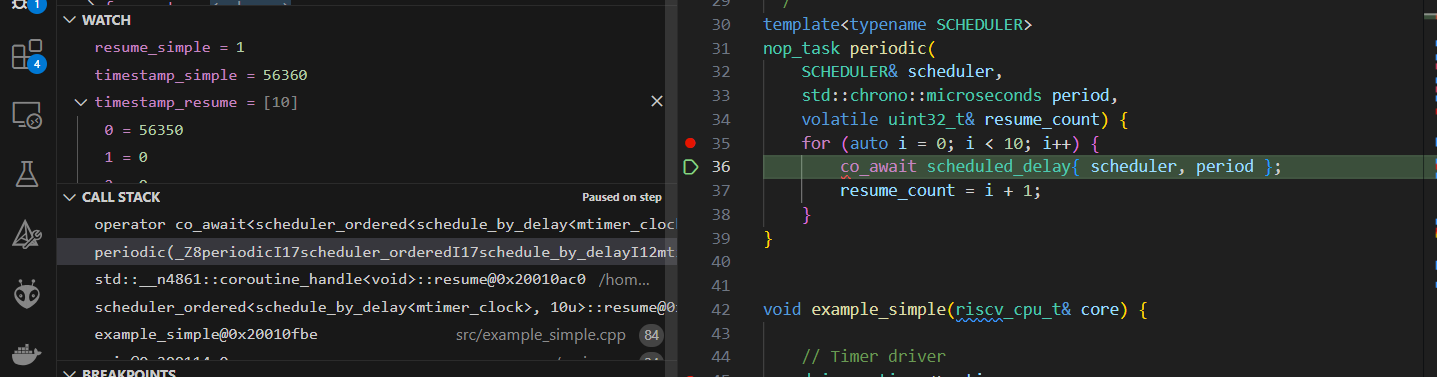
The debug sequence shows entering the function example_simple(), initializing scheduler_delay<mtimer_clock> scheduler; then calling periodic(scheduler, 100ms, resume_simple);.
Once the statement co_await scheduled_delay{ scheduler, period }; is reached the context returns to example_simple(). Then when auto [pending, next_wake] = scheduler.resume(now); is called it returns to the for loop in periodic().
The coroutine handle is stored in the scheduler class by the first call to co_await. The following call to scheduler.resume() looks up the pending coroutine handle and calls resume on the handle.

The stack of the coroutine periodic() before resume can be seen below. It’s called from example_simple().
The stack of the coroutines periodic() after resume can be seen below. It’s called from coroutine_handle::resume, which is called from scheduler_ordered::resume.
The stack of example_simple() function calling resume() is also on the same stack.
Building with CMake and running with Spike
The Makefile has targets to build with CMake.
$ make target
cmake \
        -DCMAKE_TOOLCHAIN_FILE=cmake/riscv.cmake \
        -DCMAKE_EXPORT_COMPILE_COMMANDS=ON \
        -B build_target \
        -S .
cmake --build build_target --verbose
The Makefile also has targets to simulate and trace with the standard RISC-V ISA simulator, spike. The forked spike with VCD tracing is used. The forked spike is included in a docker container.
$ make spike_sim
docker run \
        -it \
        --rm \
        -v .:/project \
        fiveembeddev/forked_riscv_spike_dev_env:latest  \
        /opt/riscv-isa-sim/bin/spike \
        --log=spike_sim.log \
        --isa=rv32imac_zicsr \
        -m0x8000000:0x2000,0x80000000:0x4000,0x20010000:0x6a120 \
        --priv=m \
        --pc=0x20010000 \
        --vcd-log=spike_sim.vcd \
        --max-cycles=10000000  \
        --trace-var=timestamp_simple --trace-var=timestamp_resume --trace-var=timestamp_resume_0 --trace-var=timestamp_resume_1 --trace-var=timestamp_resume_2 --trace-var=timestamp_resume_3 --trace-var=timestamp_resume_4 --trace-var=timestamp_resume_5 --trace-var=timestamp_resume_6 --trace-var=timestamp_resume_7 --trace-var=timestamp_resume_8 --trace-var=timestamp_resume_9 --trace-var=resume_simple \
        build_target/src/main.elf
docker run \
     --rm \
    -v .:/project \
     fiveembeddev/riscv_gtkwave_base:latest \
     vcd2fst spike_sim.vcd spike_sim.fst
The results can be viewed with GTKWave. The GTKWave savefile includes address decode and opcode decode by using docker images containing the decoders.
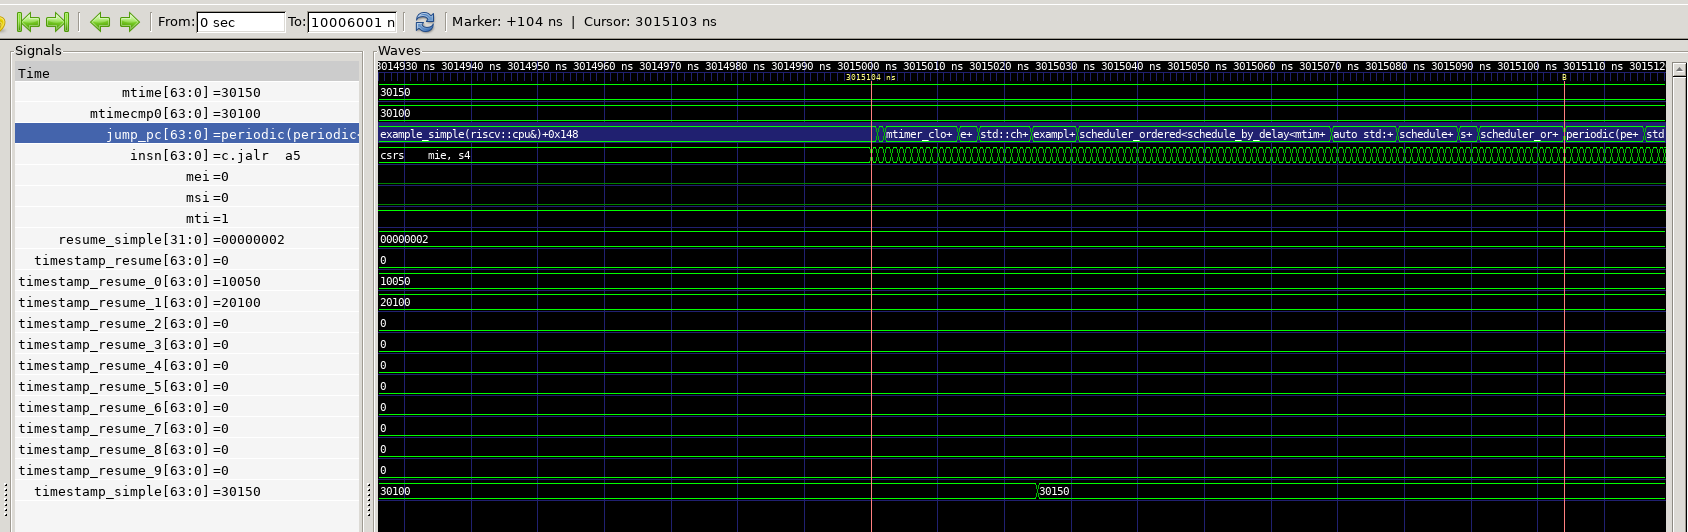
gtkwave spike_sim.fst spike_sim.gtkwThe benefit of tracing results from the ISA is that it is easy to confirm the periodic timing of the coroutine. (For this example the parameter to periodic() was changed to 1ms).
The periodic write to resume_count and timestamp_resume is traced to VCD so the exact timing of the coroutine execution is visible.
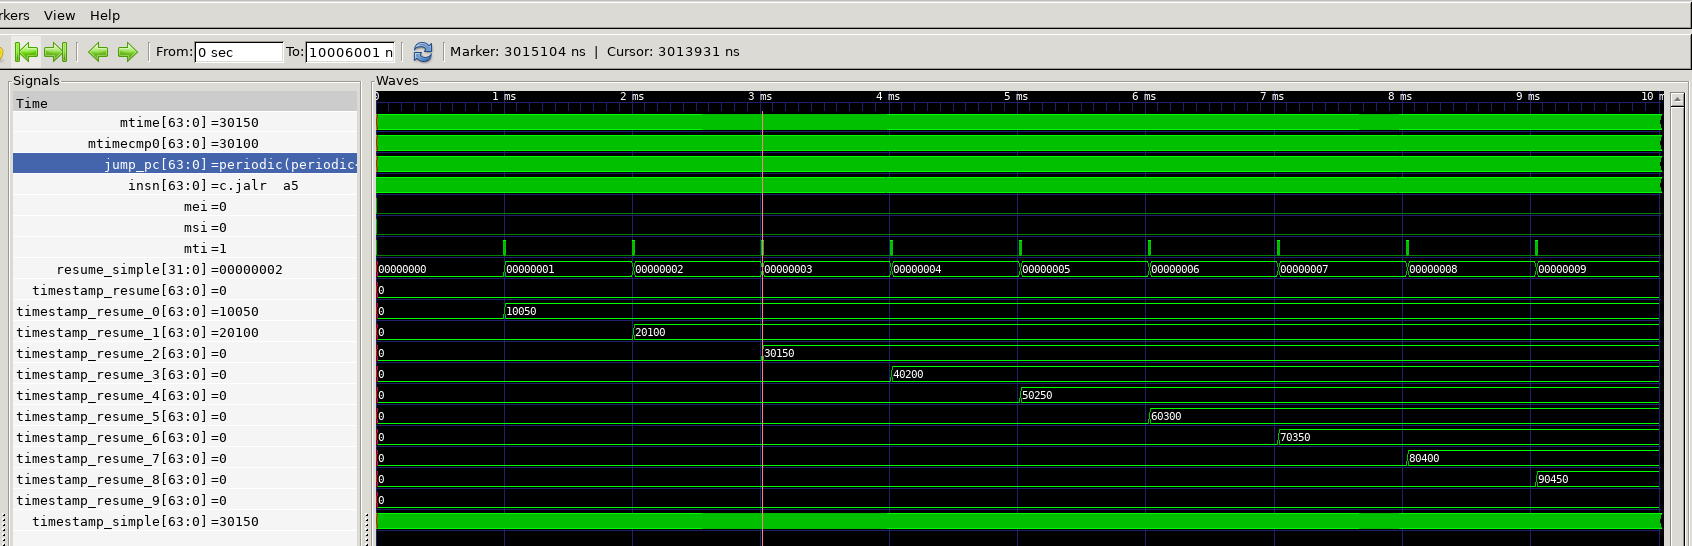
Using GTKWave the context switch can also be examined in detail. In the fake 1GhZ clock used by spike, the context switch takes 104ns.
Coroutine runtime
The runtime is described in detail in this post. The runtime for this example is in the header embeddev_coro.hpp, and it uses the embeddev_riscv.hpp header to provide a simple HAL for RISC-V and host emulation.
Summary
This post describes a simple working example of how to use C++ coroutines in an embedded context. The example and context are not meant to be a realistic use case, but the simplest possible use case that involves and interrupt handler and a context switch.
However, the example can be built on to explore portable and lightweight asynchronous programming techniques. Future posts will look at that topic.
-
The C++23 standard library provides a limited runtime for coroutines generators. ↩
Building a header-only C++20 coroutine runtime for bare-metal RISC-V
Designing a lightweight coroutine runtime for real-time tasks without an OS, featuring awaitable timers and static memory allocation
November 24, 2024 (updated: December 27, 2025) (C++,baremetal,coroutines)
Creating the coroutines runtime infrastructure
A simple coroutine example was presented in “C++20 coroutines, header only, without an OS”. This post describes the runtime used for that example in detail.
This story is also published on Medium.
Summary of the runtime files
The runtime for this example is a set of include files in include/coro. These files are used:
nop_task.hpp: Task structure includingpromise_typeto conform the C++ coroutines task concept.scheduler.hpp: Generic scheduler class that can manage a set ofstd::coroutine_handleto determine when they should resume and implement the resumption.awaitable_timer.hpp: An “awaitable” class that can be used withco_awaitto schedule a coroutines to wake up after a givenstd::chonodelay.static_list.hpp: An alternative tostd::listthat uses custom memory allocation from a static region to avoid heap usage.awaitable_priority.hpp: An alternative “awaitable” class for tasks to be scheduled to wake according to priority.
NOTE: All classes here are designed to not use the heap for allocation. They will allocate all memory from statically declared buffers.
The coroutine task concept
The nop_task class in nop_task.hpp file implements the coroutine task concept.
A coroutine task includes a promise concept with no return values. The important structures in this file arestruct nop_task / struct nop_task::promise_type. This is implemented as described in CPP Reference.
This task structure will be allocated each time a coroutine is called. To avoid heap allocation static memory allocation is used (to be described below). When using a memory constrained platform it is important to understand that the number of coroutines that can be called is restricted by the memory allocated for nop_task::task_heap_.
The relationships between the task classes is shown in the following class diagram:

The awaitable concept
The classes in awaitable_timer.hpp and awaitable_priority.hpp represent asynchronous events that pause the coroutine task until an event occurs.
These classes are designed to be returned from a co_await, this ensures a task can be scheduled to be resumed on a later event.
The awaitable_timer class implements the awaitable concept described in CPP Reference, and also the co_await operator that is overloaded to take the scheduler_delay struct and return awaitable_timer. An additional concept of the scheduler class is being used to manage the coroutine handle and wake up conditions that are used to implement coroutine task pause.
The relationships between the awaitable classes is shown in the following class diagram:

The scheduler class
The classes in scheduler.hpp are designed to do the work of managing the coroutines that are paused. It is a template class, parameterized according to the type of event that should be scheduled, and the maximum number of concurrent active tasks.
The scheduler does the work that would be done by an RTOS or General Purpose OS. It manages a task list of waiting tasks with wake conditions and resumes them on the wake event.
The awaitable classes, introduced above, will insert paused tasks via insert(). The active execution context must call resume() to resume the paused tasks. Each entry in the task list is a schedule_entry structure. The classe are templates specialized by the wake up condition.
This scheduler class is not a concept required by C++ coroutines, but in this example it is needed as there is no operating system scheduler.
The relationships between scheduler classes is shown in the following class diagram:

Using the awaitable and scheduler classes to create a software timer
The awaitable class and scheduler are combined to implement the software timer feature. The following diagram shows how the classes relate.

Walk through of the detailed sequence of suspend and resume
Now the concrete classes have been defined, the sequence to suspend and resume a coroutine class can be show.
It is shown below in 3 stages in relation to the simple timer example.
1. Setup a coroutine, and suspend on the first wait.

2. Resume and suspend, iterate over several time delays.

3. Complete iterating and exit coroutines.

Testing
The runtime has some basic unit testing implemented in test using the unity test framework. The tests are not comprehensive, but run independent of hardware as the runtime is host & OS independent. The tests are compiled for the host OS and run locally.
Summary
The runtime presented in this article is not meant for production usage and has the bare minimal functionality to implement a re-entrant function using a software timer.
However, it does show the potential of C++ coroutines to be applied to real time applications that are portable across different OS and target architectures.
Appendix
References
I won’t explain the details of C++ coroutines, there are much better resources. I used the following to understand coroutines:
- Lewis Baker’s “C++ coroutines: Understanding Symmetric-Transfer” -
- Lewis Baker’s “C++ coroutines: Understanding Symmetric-Transfer” - the code
- CPPcoro library, has not been updated for gcc support - however the documentation is great!
- The folly library has an updated coro from Lewis Baker, and some info on enabling coroutines
- Raymond Chen’s explanations, and demonstration of legacy callback integration
- Some nice examples here
- CPP Reference is incomplete, but a start
A Few implementation details
- Tasks are created at the first call to an asynchronous routine. The allocated task data structure is minimal.
- Tasks do not have a dedicated stack, they will be restored to the stack where they are woken.
- Context switching stack management is implemented by the compiler, no custom assembler routines are needed (such as portASM.s in FreeRTOS). This is possible as there is no pre-emptive context switching.
- The scheduler can be made a C++ object, and context switching can be controlled programmatically..
Direct Hardware Access in C
A RISC-V Example
March 20, 2023 (updated: December 27, 2025) (baremetal,C,articles,interrupts,timer)
This article was also posed to Medium.
The C programming language provides a thin hardware abstraction that allows us to create low-level systems programs. However, there are still many hardware features that aren’t exposed by the programming language. How do we access hardware while programming in C?
This article covers some tricks used to write low-level code in C and build a simple bare-metal run-time environment. The target hardware is a RISC-V RV32I in machine mode. The RISC-V is a simple architecture well suited to understanding low-level programming, and a small 32-bit core is ideal for applications that benefit from bare-metal programming.
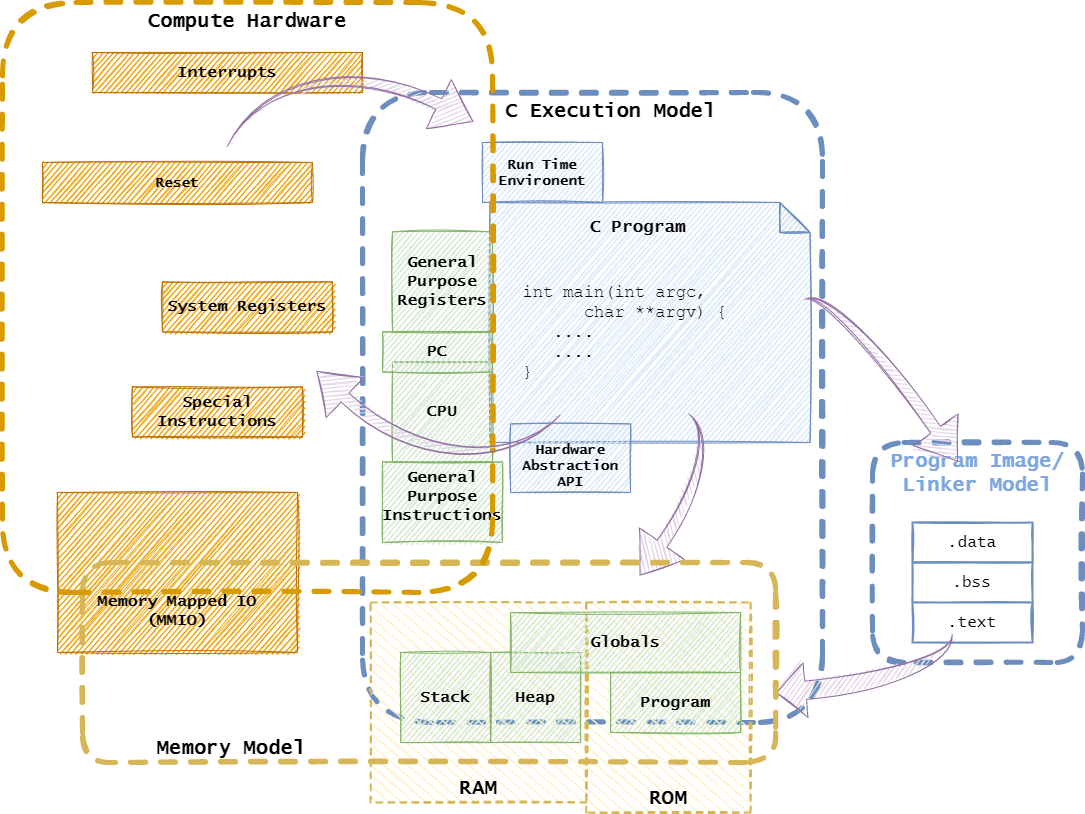
Overview
Topics
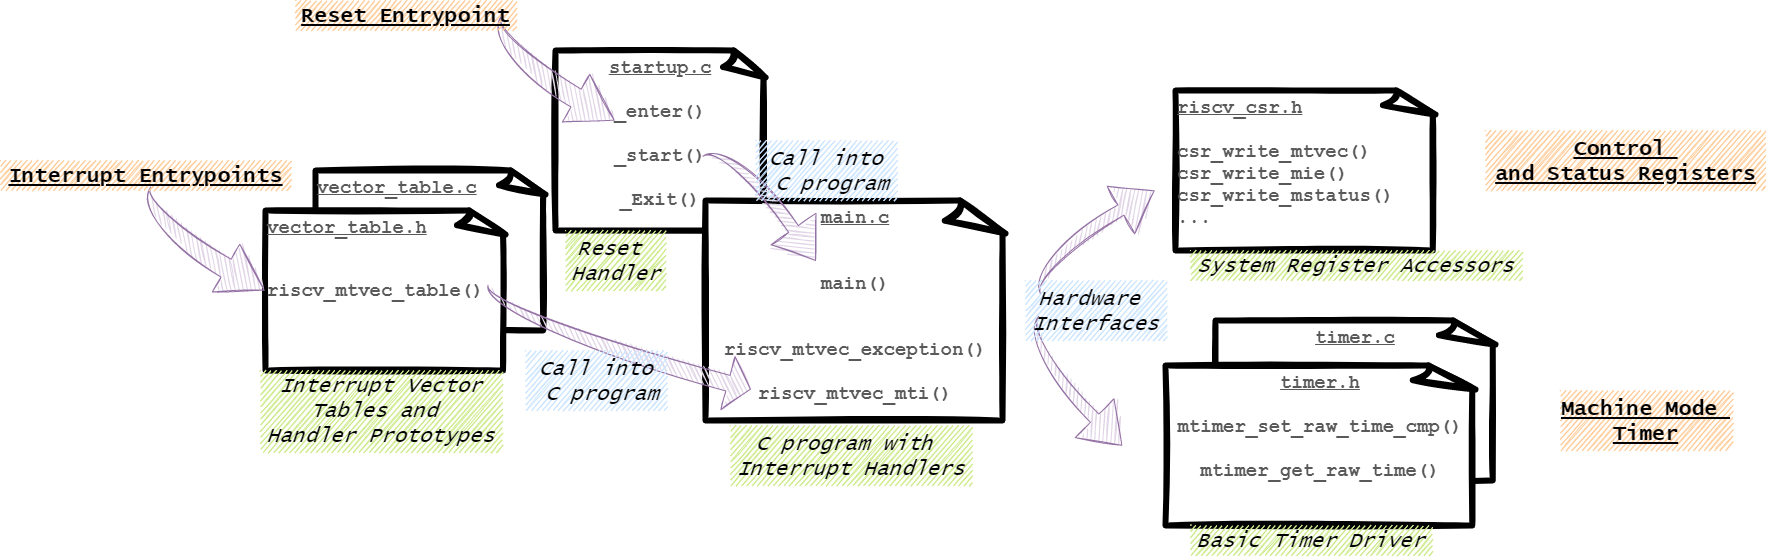
This article is will walk through an example of using vectored interrupts on RISC-V covering this set of topics.
- Calling Convention at Reset / Using a C Function as the Reset Vector
- Calling Convention at Reset / Initializing the ABI before calling C Code
- Working with the Linker / Locating the Reset Vector
- Working with the Linker / Accessing Initialization Data
- Handling Interrupts / Using a C Function as an Interrupt Handler
- Handling Interrupts / Using a C Function as an Interrupt Vector Table
- Handling Interrupts / Accessing the Interrupted Stack Frame From C
- Handling Interrupts / Aligning C Functions using a Pragma
- Handling Interrupts / Weak Function Linking to Allow Optional ISR Implementation
- Accessing the Machine / Using System Registers to Control Interrupts
- Accessing the Machine / Accessing Memory Mapped Registers to Manage the Timer
- Accessing the Machine / Using Compiler Macros to Customize for the Architecture
- Accessing the Machine / Built in functions
- Bringing it All Together / Implementing Interrupt Handlers
- Bringing it All Together / Implementing Exception Handlers
- Bringing it All Together / Implementing a System Call
- Bringing it All Together / Handling a System Call
- Bringing it All Together / The Main Function
- Building and Running / PlatformIO IDE
- Building and Running / Command Line/CI
The Toolchain
It’s essential to understand the toolchain when doing low level programming. This article will look at these toolchain features:
- Inline Assembler that gives direct access to the target CPU instructions and registers.
- Function Attributes and Variable Attributes change the way code is generated for functions and variables. This includes many that are machine specific, such as RISC-V function attributes.
- Built-in Functions that provide a C function call like interface to hardware features.
- Pragmas to enable and disable compiler features and modes.
- The Linker, in particular, becoming familiar with the linker script.
This article won’t go into the details of these features, but will instead give examples of how to use them. Often they must be combined to achieve the desired result. An understating of the machine model is also needed, In particular the ISA and ABI.
A Warning
This article is not about modern best practice programming. Such best practice targets the C execution model, via an abstract machine and looks to avoid all undefined behavior. This article is about peeking and poking into hardware to wiggle logic values in wires and make things happen.

Calling Convention at Reset
Using a C Function as the Reset Vector
At reset, how does the processor start executing our C code?
For a RISC-V processor, the reset process involves setting the PC to the _enter function address and executing code at that address. The actual address of _enter is implementation defined. Also note; a C function at this address can’t be “called” as calling a C function requires the stack to be initialized.
To define a reset handler in C that can be executed without a stack, the naked function attribute can be applied to the function prototype. This attribute disables stack access in the prologue/epilogue code generated by the compiler.
void _enter(void) __attribute__ ((naked));Initializing the ABI before calling C Code
After reset, when can we start to execute normal C code?
The ABI requires a set of registers to be initialized before C code can be executed:
- The
spstack pointer must be initialized to point to an area of memory reserved for the stack in the linker script.- Our linker script has defined this address as
_sp.
- Our linker script has defined this address as
- The
gpglobal pointer must be set to the base address for offset addressing.- The linker script has defined this address as
__global_pointer$.
- The linker script has defined this address as
- Once the stack is defined perform it’s possible to jump to a C routine,
_start, without pushing the state to the stack.
Our _enter function uses inline assembler to directly initialize these processor registers before calling _start:
void _enter(void)   {
    // Setup SP and GP
    // The locations are defined in the linker script
    __asm__ volatile  (
        ".option push;"
        ".option norelax;"
        "la    gp, __global_pointer$;"
        ".option pop;"
        "la    sp, _sp;"
        "jal   zero, _start;");
    // This point will not be executed, _start() will be called with no return.
}
As it is a naked function it uses basic asm.
A global pointer register is an architectural choice made by many RISC architectures including RISC-V, but is not universal, for example ARM Cortex-M does not need this.
Working with the Linker
The linker script integrates our C program into the target memory layout. These examples are based on metal.default.lds provided by SiFive.
Locating the Reset Vector
How does the processor know to call _enter at reset?_
The _enter function needs to be located at a pre-determined address called the reset vector. To locate a function at the reset vector address in C the section function attribute can be used in conjunction with the linker script.
In this example, the .enter section is used to place the _enter function at the start of ROM memory. On our target this is 0x20010000. This address then executed at reset. For RISC-V the exact address is implementation defined, and may even depend on some boot-rom embedded within an SoC.
MEMORY {
    rom (irx!wa) : ORIGIN = 0x20010000, LENGTH = 0x6a120
}
SECTIONS {
    .init : {
        KEEP (*(.enter))
        ...
    } >rom :rom
}
The previous C function declaration for _enter needs to be updated to locate it in this .enter section.
extern void _enter(void) __attribute__ ((naked, section(".enter")));Accessing Initialization Data
If we have global variables, how are they initialized in RAM before our program is run?
As RAM is in an unknown state at boot, all globals are undefined by default.
The linker and compiler define sections in the application image and program memory to hold and receive default values.
- The
bsssection contains global variables with no initial value. The SRAM allocated to these variables is cleared to 0. - The
datasection contains global variables with initial values. These values are copied from read-only memory (FLASH/ROM) to SRAM.
Other sections relate to code regions to be initialized, or used in initialization.
- The
itimsection is a code section that is to be copied to and executed from SRAM to improve performance. - The
initandfiniarrays are tables of constructor and destructor function pointers for global variables.
As we are creating our own run-time environment we need to initialize RAM ourselves. The start-up routine uses the above sections located in (FLASH/ROM) to perform initialization of the corresponding sections in RAM. An important section is the data segment. This holds the initial values for all global variables.
A simplified sample of the linker script is here:
MEMORY
{
    ram (arw!xi) : ORIGIN = 0x80000000, LENGTH = 0x4000
    rom (irx!wa) : ORIGIN = 0x20010000, LENGTH = 0x6a120
}

SECTIONS
{
...
    .data : ALIGN(8) {
        *(.data .data.*)
         .....
    } >ram AT>rom

    ....

    PROVIDE( data_source_start = LOADADDR(.data) );
    PROVIDE( data_target_start = ADDR(.data) );
    PROVIDE( data_target_end = ADDR(.data) + SIZEOF(.data) );
    ...
}
The symbols defined with
PROVIDE
are accessible from the C program. The start-up code below copies from
one linker defined .data section at data_source_start in ROM to the .data section at data_target_start in RAM.
The linker symbols represent objects at the address of the linker segment
start or end, so we take the address of these symbols, e.g. (void*)&data_target_start, or use the
delta of the addresses to get the length, e.g. (&data_target_end - &data_target_start).
extern const uint8_t data_source_start;
extern uint8_t data_target_start;
extern uint8_t data_target_end;

...

void _start(void) {
    ...
    // Initialize the .data section (global variables with initial values)
    __builtin_memcpy((void*)&data_target_start,
                     (const void*)&data_source_start,
                     (&data_target_end - &data_target_start));
    ...

    int rc = main();

    ...
}
The use of
memcpy() at
this point is possibly problematic as it introduces a standard library
dependency, however, so a GCC built __builtin_memcpy in is used
instead as it should be the most efficient copy the compiler can
implement.
Handling Interrupts
Interrupts are signals from the hardware indicating that it needs attention. They can be called at any time during our C program’s execution (asynchronous), and a critical requirement is that the program can resume when they are finished.
Using a C Function as an Interrupt Handler
When an interrupt occurs, can it be serviced by a C function?
An Interrupt Service Routine(ISR) is a function called when a processor services an exception or an interrupt. Unlike a normal function, it must save all registers to the stack, and use a special return instruction. The interrupt function attribute can turn a C function into an ISR. In general, it will:
- customize the prologue/epilogue code generated by the compiler so all registers are saved; and
- use an interrupt return instruction, such as mret, to return from the function.
RISC-V defines CPU Modes such as machine and supervisor, and this mode is passed as an argument to the attribute.
/** Machine mode exception handler */
void riscv_mtvec_exception(void) __attribute__ ((interrupt ("machine")) );
/** Supervisor mode exception handler */
void riscv_stvec_exception(void) __attribute__ ((interrupt ("supervisor")) );
/** Machine mode timer interrupt */
void riscv_mtvec_mti(void) __attribute__ ((interrupt ("machine") ));
/** Supervisor mode timer interrupt */
void riscv_stvec_sti(void) __attribute__ ((interrupt ("supervisor")) );
(An exception to this is the ARM Cortex-M, that processor is designed to enter interrupt handlers in a way consistent with its ABI.)
Using a C Function as an Interrupt Vector Table
What about vectored interrupts, can a jump table be constructed in C?
The most basic RISC-V vectored interrupt mode uses a jump table to implement an interrupt vector table(IVT). This is a bit like a set of goto statements in C. However, we cannot actually “goto” functions in C as a jump table does.
To declare a function as jump table in C these function attributes are defined on the function prototype:
- naked: So only code for the jump table is generated, disable the prologue/epilogue the compiler.
- aligned: Use the strict memory alignment required by the RISC-V Interrupt Vector register, mtvec,
void riscv_mtvec_table(void) __attribute__ ((naked,aligned(16)));The jump table is implemented using inline assembler. The .org assembler directive ensures all jal jump instructions are at the correct offset in the jump table. The target functions are declared as C functions with the interrupt function attribute as above.
void riscv_mtvec_table(void) {
    __asm__ volatile (
        ".org  riscv_mtvec_table + 0*4;"
        "jal   zero,.handle_mtvec_exception;" /* 0  */
        ".org  riscv_mtvec_table + 1*4;"
        "jal   zero,riscv_mtvec_ssi;"  /* 1  */
        ".org  riscv_mtvec_table + 3*4;"
        "jal   zero,riscv_mtvec_msi;"  /* 3  */
        ".org  riscv_mtvec_table + 5*4;"
        "jal   zero,riscv_mtvec_sti;"  /* 5  */
        ".org  riscv_mtvec_table + 7*4;"
        "jal   zero,riscv_mtvec_mti;"  /* 7  */
        ".org  riscv_mtvec_table + 9*4;"
        "jal   zero,riscv_mtvec_sei;"  /* 9  */
        ".org  riscv_mtvec_table + 11*4;"
        "jal   zero,riscv_mtvec_mei;"  /* 11 */
        );
}
As it is a naked function it uses basic asm.
In the table above individual functions are defined for each interrupt and exception.
- Synchronous Exceptions (
riscv_mtvec_exception()) - these are called by first jumping to the label.handle_mtvec_exception(See the next section). - Software interrupts in machine and supervisor mode (
riscv_mtvec_msi(),riscv_mtvec_ssi()). - Timer interrupts in machine and supervisor mode (
riscv_mtvec_msi(),riscv_mtvec_ssi()). - External interrupts in machine and supervisor mode (
riscv_mtvec_msi(),riscv_mtvec_ssi()).
Accessing the Interrupted Stack Frame From C
How can the exception handler access the stack frame from the source of the exception?
The method I’m using here is based on the Linux kernel. At exception entry in entry.S the caller context is saved on the stack in a structure defined in ptrace.h. System calls can access the registers via functions define in syscall.h to abstract the machine.
The example has a simplified flow and is embedded within C. The structure containing the registers, exception_stack_frame_t is defined in include/riscv-abi.h. Some registers are deliberately not saved. The s0-s11 registers are callee saved, so can be expected to be saved when calling any C function. The gp and tp and sp registers are not saved as we are operating in a single binary/single stack.
#if __riscv_xlen == 32
typedef uint32_t uint_reg_t;
#elif __riscv_xlen == 64
typedef uint64_t uint_reg_t;
#endif

typedef struct {
    // Global registers - saved if
    uint_reg_t ra;   // return address (global)
    // Saved as they will not be saved by callee
    uint_reg_t t0;   // temporary register 0 (not saved)
    uint_reg_t t1;   // temporary register 1 (not saved)
#if !defined(__riscv_32e)
    uint_reg_t t2;   // temporary register 2 (not saved)
#endif
    // Arguments are saved for reference by 'ecall' handler
    // and as any function called expects them to be saved.
    uint_reg_t a0;   // function argument/return value 0 (caller saved)
    uint_reg_t a1;   // function argument/return value 1 (caller saved)
    uint_reg_t a2;   // function argument 2 (caller saved)
    uint_reg_t a3;   // function argument 3 (caller saved)
#if !defined(__riscv_32e)
    uint_reg_t a4;   // function argument 4 (caller saved)
    uint_reg_t a5;   // function argument 5 (caller saved)
    uint_reg_t a6;   // function argument 6 (caller saved)
    uint_reg_t a7;   // function argument 7 (caller saved)
#endif
#if !defined(__riscv_32e)
    // Saved as they will not be saved by callee
    uint_reg_t t3;   // temporary register 3 (not saved)
    uint_reg_t t4;   // temporary register 4 (not saved)
    uint_reg_t t5;   // temporary register 5 (not saved)
    uint_reg_t t6;   // temporary register 6 (not saved)
#endif
} exception_stack_frame_t;
There are no specific stack push/pop instructions for RISC-V, so we use sw and lw on a rv32* bit architecture. The immediate offset to the stack pointer is determined via the offsetof operator. In the example these are wrapped in helper macros SAVE_REG and LOAD_REG.
#define SAVE_REG(REG)                                                   \
    __asm__ volatile(                                                   \
        "sw	" #REG " , %0(sp); "                                        \
        : /* no output */                                               \
        : /* immediate input */ "i" (offsetof(exception_stack_frame_t,REG)) \
        : /* no clobber */)
#define LOAD_REG(REG)                                                   \
    __asm__ volatile(                                                   \
        "lw	" #REG " , %0(sp); "                                        \
        : /* no output */                                               \
        : /* immediate input */ "i" (offsetof(exception_stack_frame_t,REG)) \
        : /* no clobber */)
Macros to save and load the stack are composed of SAVE_REG and
LOAD_REG. The
sizeof operator
allows us to move the stack pointer to explicitly allocate one
instance of the exception_stack_frame_t on the stack.
The EXCEPTION_SAVE_STACK macro is shown below. The
EXCEPTION_RESTORE_STACK macro is similar, but moves the stack
pointer at the end of the sequence to free the
exception_stack_frame_t instance. The SAVE_REG_NOT_E and
LOAD_REG_NOT_E macros are defined to allow for differences between
rv32e and other architectures.
The use of sizeof and offsetof operators allows the example to avoid magic numbers and size assumptions and bridge C to assembler in a more maintainable way.
#define EXCEPTION_SAVE_STACK                                            \
    /* Move stack frame */                                              \
    __asm__ volatile(                                                   \
        "addi sp, sp, -%0;"                                             \
        : /* no output */                                               \
        : /* immediate input */ "i" (sizeof(exception_stack_frame_t))   \
        : /* no clobber */);                                            \
    /* Ignore 0: zero */                                                \
    SAVE_REG(ra);                                                       \
    /* Ignore 2,3,4: Stack, global, thread pointers */                  \
    SAVE_REG(t0);                                                       \
    SAVE_REG(t1);                                                       \
    SAVE_REG_NOT_E(t2);                                                 \
    SAVE_REG(a0);                                                       \
    SAVE_REG(a1);                                                       \
    SAVE_REG(a2);                                                       \
    SAVE_REG(a3);                                                       \
    SAVE_REG_NOT_E(a4);                                                 \
    SAVE_REG_NOT_E(a5);                                                 \
    SAVE_REG_NOT_E(a6);                                                 \
    SAVE_REG_NOT_E(a7);                                                 \
    SAVE_REG_NOT_E(t3);                                                 \
    SAVE_REG_NOT_E(t4);                                                 \
    SAVE_REG_NOT_E(t5);                                                 \
    SAVE_REG_NOT_E(t6)
Finally, we call into C and pass the stack pointer as the first
argument in a0. As riscv_mtvec_exception is a standard C
function we need to save the return address to ra, to ensure the
C function returns to the point where it was called. The return
value in a0 is copied to the sp on return, to potentially allow
for a context switch (not implemented here).
void riscv_mtvec_table() {
    __asm__ volatile(
    ...
    ".handle_mtvec_exception:");

    EXCEPTION_SAVE_STACK;

    __asm__ volatile(
        // Current stack pointer
        // Save to a0
        "mv a0, sp;"

        // Jump to exception handler
        // Pass
        "jal   ra,riscv_mtvec_exception;" /* 0  */

        // Restore stack pointer from return value (a0)
        "mv sp, a0;"
        );

    EXCEPTION_RESTORE_STACK;

    // Return
    __asm__ volatile("mret;");
Aligning C Functions using a Pragma
An alternate option to align a function in memory is to use a #pragma.
On the command line we might apply -falign-functions=n to change function alignment globally. Using a #pragma this can be applied to a region of code. The optimize pragma selects from the same options provided on the command line.
#pragma GCC push_options

// Ensure all ISR tables are aligned.
#pragma GCC optimize ("align-functions=4")

void riscv_mtvec_table(void) {
...
}

#pragma GCC pop_options
In my opinion, the function attribute is a cleaner way to specify a code generation option. However, a #pragma can be applied to many options and across an area of code. For example, we might generally optimize for size (-Os), but a time critical interrupt handler may require speed optimization (-O2). A #pragma can make such local compiler option changes.
Weak Function Linking to Allow Optional ISR Implementation
The vector table above links to an independent function for each interrupt in the system. How do we avoid having to implement each ISR as a separate function? That can take up a lot of code space!
A weak alias can be used to map unimplemented functions to a default function, in this case, the riscv_nop_machine ISR.
e.g. In our example main.c program ISRs for msi and mei are not implemented. These are linked to the default NOP ISR, riscv_nop_machine. The weak linking to default ISRs is defined in src/vector_table.c for all interrupts.
static void riscv_nop_machine(void)    __attribute__ ((interrupt ("machine")) );

void riscv_mtvec_msi(void) __attribute__ ((interrupt ("machine")     , weak, alias("riscv_nop_machine") ));
void riscv_mtvec_mei(void) __attribute__ ((interrupt ("machine")     , weak, alias("riscv_nop_machine") ));

static void riscv_nop_machine(void)  {
    // Nop machine mode interrupt.
}
Accessing the Machine
The real machine often has features and functions that have no equivalent in the C programming language abstract machine. The hardware needs to be accessed via instructions or the peripheral bus.
Using System Registers to Control Interrupts
How can we enable/disable interrupts using system registers in C?
The Control and Status registers(CSRs) used to control interrupts are accessed using special instructions on RISC-V. This requires inline assembler to access. GCC allows us to call functions and exchange C values via registers or immediate.
To load the vector table at riscv_mtvec_table, the function address is written to
mtvec with the mode set to 1.
#define RISCV_MTVEC_MODE_VECTORED 1
...
    // Set up the IRQ handler entry point, set the mode to vectored
    csr_write_mtvec((uint_xlen_t) riscv_mtvec_table | RISCV_MTVEC_MODE_VECTORED);
For this example, the csr_write_mtvec function is declared in a header include/riscv-csr.h, a header file with functions to access all system registers. Inline assembler is used to access the special instruction, and the extended __asm__ statement with input operands is used to specify the data register allocated by the C compiler containing the value to be written to mtvec.
static inline void csr_write_mtvec(uint_xlen_t value) {
    __asm__ volatile ("csrw    mtvec, %0"
                      : /* output: none */
                      : "r" (value) /* input : from register */
                      : /* clobbers: none */);
}
Accessing Memory Mapped Registers to Manage the Timer
How do we translate the address of a memory-mapped IO (MMIO) register to a C pointer?
MMIO registers have an address within the system memory map. However, they are not equivalent to variables located in RAM, as they may have side effects on reading, writing, or possibly change asynchronously without access from software.
The machine mode timer mtime, located within the core local interrupt controller (CLINT) is a good example on RISC-V. It is a 64-bit word located at an offset of 0xBFF8 within the CLINT, which is located at 0x2000000. (NOTE - This address is implementation defined.)
Macros are defined within the driver header timer.h, so the address does not need to be used directly.
#define RISCV_CLINT_ADDR 0x2000000
#define RISCV_MTIME_ADDR    ( RISCV_CLINT_ADDR + 0xBFF8)
The simplest way to access MMIO is to cast the address integer value (e.g. RISCV_MTIME_ADDR) to a volatile pointer to an unsigned integer the same size as the register (e.g. volatile uint64_t *).
- The standard integer types are defined in
stdint.h. These can be used to match the register width. - Volatile is required as MMIO is not “memory” as understood by the abstract memory model. (In modern C/C++ this is one of the few acceptable uses of volatile.).
- Getting the word size right is important, as access to neighboring registers in MMIO may cause side effects.
volatile uint64_t *mtimecmp = (volatile uint64_t*)(RISCV_MTIMECMP_ADDR);However, in addition to register size we also need to consider bus size.
In the driver implementation timer.c when __riscv_xlen is set to 32 a set of high and low registers are defined.
    volatile uint32_t * mtimel = (volatile uint32_t *)(RISCV_MTIME_ADDR);
    volatile uint32_t * mtimeh = (volatile uint32_t *)(RISCV_MTIME_ADDR+4);
The implementation of mtimer_get_raw_time() shows how the registers are read via pointer de-referencing with the * operator.
uint64_t mtimer_get_raw_time(void) {
#if ( __riscv_xlen == 64)
    // Atomically read the 64 bit value
    return *mtime;
#else
    uint32_t mtimeh_val;
    uint32_t mtimel_val;
    do {
        mtimeh_val = *mtimeh;
        mtimel_val = *mtimel;
       // Read mtimeh again. If mtimel has overflowed and mtimeh incremented
       // then we will detect it here and loop again.
       // Do to the low frequency of mtimeh this iteration should be rare.
    } while (mtimeh_val != *mtimeh);
    return (uint64_t) ( ( ((uint64_t)mtimeh_val)<<32) | mtimel_val);
#endif
}
The implementation of mtimer_set_raw_time_cmp() shows how the registers are written via pointer de-referencing with the * operator.
void mtimer_set_raw_time_cmp(uint64_t clock_offset) {
    uint64_t new_mtimecmp = mtimer_get_raw_time() + clock_offset;
#if (__riscv_xlen == 64)
    // Atomic bus access
    *mtimecmp = new_mtimecmp;
#else
    // AS we are doing 32 bit writes, an intermediate mtimecmp value may cause spurious interrupts.
    // Prevent that by first setting the dummy MSB to an unachievable value
    *mtimecmph = 0xFFFFFFFF;
    // set the LSB
    *mtimecmpl = (uint32_t)(new_mtimecmp & 0x0FFFFFFFFUL);
    // Set the correct MSB
    *mtimecmph = (uint32_t)(new_mtimecmp >> 32);
#endif
}
Both implementations have specialized 32 bit versions.
- There is no way to do an atomic 64 bit timer count read over a 32 bit bus, so we need to read each 32 bit word independently and confirm there has been no overflow from low to high word of mtime.
- There is no way to do an atomic 64 bit compare value write a 32 bit bus, so we need to ensure the transient mtimecmp register value does not cause an interrupt. The MSB is set to an impossible value before setting the LSB to the real value, followed by the real MSB value.
Using Compiler Macros to Customize for the Architecture
How can we select different implementations depending on architecture variants?
RISC-V is a very customizable architecture, and the code may need to change to match the target architecture. The compiler defines system specific pre-defined macros for this purpose.
For example, the mcause register, like many CSRs, places a control bit in the MSB. This changes depending on if we are an rv32* or rv64* architecture. The __riscv_xlen macro can be used to locate the MSB, as is done in riscv-csr.h. I’ve listed some common ones on my ISA & Extensions Quick Reference, along with links to the source specification documents.
#define MCAUSE_INTERRUPT_BIT_MASK     (0x1UL << ((__riscv_xlen-1)))

 #if defined(__riscv_32e)
// Ignore registers not implemented in rv32e
#define SAVE_REG_NOT_E(REG)
#define LOAD_REG_NOT_E(REG)
#else
// Handle all registers
#define SAVE_REG_NOT_E SAVE_REG
#define LOAD_REG_NOT_E LOAD_REG
#endif
Built in functions
Does the compiler offer a built in and/or portable way to access the machine functionality?
For some features there are built in functions provided by the compiler, and these may be portable across architectures.
- Atomics and Synchronization built in functions to perform safe memory access when other cores may be accessing the same memory.
- Modern C11 also defines standard atomic functions.
- Vector Extension to access SIMD features. There are also intrinsic functions that match the instruction set of the underlying architectures (such as Intel’s AVX/SSE/MMX or or NEON), although I can’t see any for RISC-V’s vector extensions right now.
- Target Built-ins to access target registers and instructions. The RISC-V section is quite light here.
- I’ve used
__builtin_memcpyand__builtin_memsetin the hope the compiler knows the most efficient copy and bullk write algoithms for the platform.
The example for this article does not use many built in functions, as the target is a simple single hart RV32I. I’d like to explore these in another article.
Bringing it All Together
This article so far has looked at building blocks only, let’s put together the simple program that configures and responds to timer interrupts and synchronous exceptions.
The example includes the following source files:
- src/startup.c - Entry/Startup/Runtime
- src/main.c - Main Program
- src/timer.c / include/timer.h - Timer Driver
- src/vector_table.c / include/vector_table.h - Interrupt Vector Table
- include/riscv-csr.h / include/riscv-interrupts.h - RISC-V Hardware Support
Implementing Interrupt Handlers
The handler definitions are marked with GCC interrupt function
attributes. This
will ensure the stack is saved at entry and restored on return, and
the mret, sret or uret instruction is used to return. The
handler implementation does not need this attribute, assuming the declarations in vector_table.h are included.
The timer interrupt service routine handles the interrupt by adding an extra second to mtimecmp. That will disable the current mti interrupt and schedule the next.
// The 'riscv_mtvec_mti' function is added to the vector table by the vector_table.c
void riscv_mtvec_mti(void)  {
    // Timer exception, re-program the timer for a one second tick.
    mtimer_set_raw_time_cmp(MTIMER_SECONDS_TO_CLOCKS(1));
    timestamp = mtimer_get_raw_time();
}
Implementing Exception Handlers
The exception handler decodes the mcause register to determine what exception has occurred. In the case of an environment call from m mode, our handler simply increments ecall_count so that we can observe the exception. Before returning, the mepc register is incremented by the size of one ecall instruction word. This value is restored to pc on return from exceptions with mret, so we need to move to the next instruction.
// The 'riscv_mtvec_exception' function is added to the vector table by the vector_table.c
// This function looks at the cause of the exception, if it is an 'ecall' instruction then increment a global counter.
exception_stack_frame_t *riscv_mtvec_exception(exception_stack_frame_t *stack_frame)
    uint_xlen_t this_cause = csr_read_mcause();
    uint_xlen_t this_pc    = csr_read_mepc();
    //uint_xlen_t this_value = csr_read_mtval();
    switch (this_cause) {
        case RISCV_EXCP_ENVIRONMENT_CALL_FROM_M_MODE:
            ecall_count++;
            // Make sure the return address is the instruction AFTER ecall
            csr_write_mepc(this_pc+4);
            break;
    }
    return stack_frame;
}
Other exceptions are not handled. What is the correct response for a exception that can’t be handled? In a conventional application a call to something like abort() might be made. I’ve usually taken three approaches:
- If the debugger is connected, call the debugger breakpoint instruction, for RISC-V that is the ebreak instruction.
- If targeting specific hardware with hard reset support, perform a hard reset.
- Perform a soft reset. Re-initialize and restart the firmware.
For the example I’ve implemented the last option, a simple soft reset. It has been done by making the _entry() function address the exception return address via mepc.
extern void _enter(void);
...
exception_stack_frame_t *riscv_mtvec_exception(exception_stack_frame_t *stack_frame) {
    uint_xlen_t this_cause = csr_read_mcause();
    switch (this_cause) {
    ...
    default:
        // All other system calls.
        // Unexpected calls, do a soft reset by returning to the startup function.
        csr_write_mepc((uint_xlen_t)_enter);
        break;
    }
    ...
}
Implementing a System Call
The ecall instruction allows a context switch from user software into an exception handler. These are often used for system calls, such as a Linux user space function calling into the kernel to perform a system task. For this example we’re just going through the motions of passing data in and out of an exception handler.
The ecall instruction does not take parameters, instead before executing this instruction the software loads registers according to the calling convention. One calling convention is defined by the SBI Binary Encoding. Another is defined by the Linux kernel, in the syscall.h file. I’ve defined a dummy one below, a0 as the argument, a0 also as the return value and a7 as the function ID (or a3 for RV32E).
The example uses explicit register variables to load the registers appropriately. These are custom extension of the almost obsolete register storage class specifier.
static unsigned long int riscv_ecall(ecall_function_id_t function_id, unsigned long int param0) {
    // Pass and return value register.
    register unsigned long a0 __asm__("a0") = param0;
    // Use the last argument register as call ID
#ifdef __riscv_32e
    // RV32E only has a0-a3 argument registers
    register unsigned long ecall_id __asm__("a3") = function_id;
#else
    // Non -e variants have has a0-a7 argument registers
    register unsigned long ecall_id __asm__("a7") = function_id;
#endif
    __asm__ volatile("ecall "
                     : "+r"(a0) /* output : register */
                     : "r"(a0), "r"(ecall_id) /* input : register*/
                     : /* clobbers: none */);
    return a0;
}
The RISC-V newlib has an implementation in libgloss/riscv/internal_syscall.h.
Handling a System Call
Implementing a system call relies on accessing the registers saved at the point of entry. For this example they have been saved by src/vector_table.c and passed to riscv_mtvec_exception() as a struct (exception_stack_frame_t), defined in include/riscv-abi.h.
typedef struct {
    ...
    uint_reg_t a0;   // function argument/return value 0 (caller saved)
    uint_reg_t a3;   // function argument 3 (caller saved)
#if !defined(__riscv_32e)
    ...
    uint_reg_t a7;   // function argument 7 (caller saved)
#endif
    ...
} exception_stack_frame_t;

#if defined(__riscv_32e)
#define RISCV_REG_LAST_ARG a3
#else
#define RISCV_REG_LAST_ARG a7
#endif


exception_stack_frame_t *riscv_mtvec_exception(exception_stack_frame_t *stack_frame) {
...
    switch (this_cause) {
    case RISCV_EXCP_ENVIRONMENT_CALL_FROM_M_MODE: {
        // Dummy syscall handling...
        unsigned long int ecall_id = stack_frame->RISCV_REG_LAST_ARG;
        if (ecall_id == ECALL_INCREMENT_COUNT) {
            unsigned long int arg0 = stack_frame->a0;
            stack_frame->a0 = arg0+1;
        }
        // Make sure the return address is the instruction AFTER ecall
        csr_write_mepc(this_pc + 4);
        break;
    }
...
The Main Function
The main() function configures the interrupts before entering an endless loop. The flow is:
- Disable all interrupts. (via mstatus.mie and mie )
- Configure the interrupt vector table. (via mtvec)
- Set the timer expiry. (via mtimecmp)
- Enable the timer interrupt. (via mie)
- Enable all interrupts. (via mstatus.mie)
int main(void) {

    // Global interrupt disable
    csr_clr_bits_mstatus(MSTATUS_MIE_BIT_MASK);
    csr_write_mie(0);

    // Setup the IRQ handler entry point, set the mode to vectored
    csr_write_mtvec((uint_xlen_t) riscv_mtvec_table | RISCV_MTVEC_MODE_VECTORED);

    // Setup timer for 1 second interval
    mtimer_set_raw_time_cmp(MTIMER_SECONDS_TO_CLOCKS(1));

    // Enable MIE.MTI
    csr_set_bits_mie(MIE_MTI_BIT_MASK);

    // Global interrupt enable
    csr_set_bits_mstatus(MSTATUS_MIE_BIT_MASK);

    ...
After configuring interrupts it enters a busy loop. The wfi instruction should place
the CPU in low-power state until an interrupt occurs, rather than just
busy looping. There is
no reason to call ecall other than to test out the
riscv_mtvec_exception, and local_ecallcount only exists to test passing data back and forth to the exception.
static inline void riscv_wfi(void) {
    __asm__ volatile("wfi");
}

....

int main(void) {

    ...

    // Busy loop
    // Keep a local counter of how many times `ecall` has been executed.
    unsigned int local_ecallcount = 0;
    // Busy loop
    do {
        // Wait for timer interrupt
        riscv_wfi();
        // Try a synchronous exception - ask the exception handler to increment our counter.
        local_ecallcount = riscv_ecall(ECALL_INCREMENT_COUNT, local_ecallcount);
    } while (1);

   ...
}
Building and Running
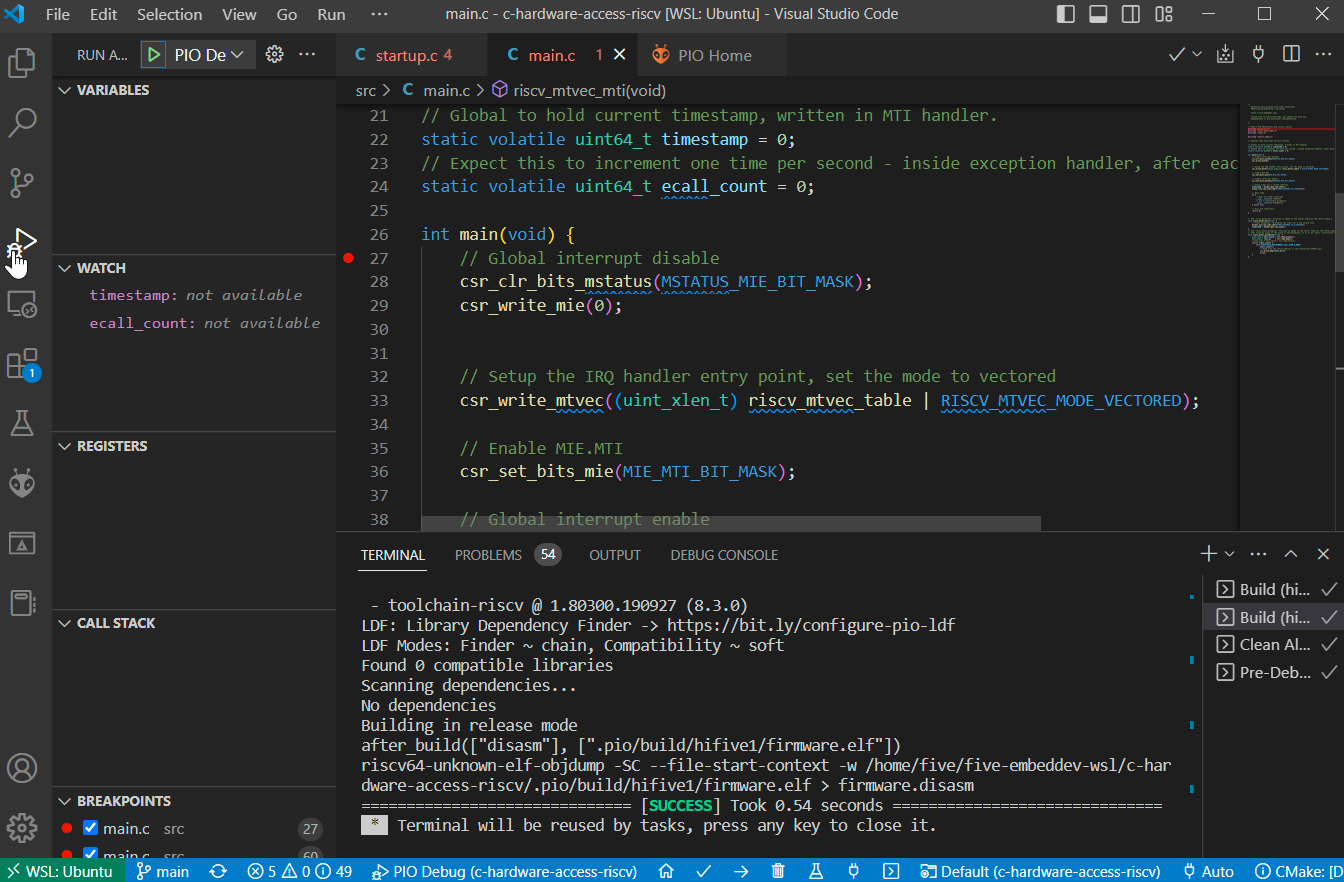
PlatformIO IDE
The PlatformIO IDE is a device and vendor independent development environment for embedded systems For this project has been setup configured to target QEMU emulating a hifive1 board.
The IDE can step through from before main(), and into each interrupt handler.
Command Line/CI
For this example GitHub actions are implemented with Docker, CMake and Xpack-GCC.
CMake Build Environment:
GitHub/Docker CI
PlatformIO can also be used from the CLI, and CI. The purpose here is to show a few options for development that are not tied to any particular silicon vendor.
Conclusion
This is a long article for a relatively simple piece of code. The complexity was added by building from the bottom up, investigating each step and looking into the toolchain features that enable us to break out of the standard C execution model.
The purpose of this article has been to capture experience building building firmware for custom SoCs based on ARM Cortex-M, RISC-V cores and even the 8051 from the ground up. With the emergence of RISC-V the opportunity to build and target such custom platforms is growing. For small deeply embedded firmware, building a single code base in C can make life easier than figuring out what vendor support library files in assembly do are if they are really needed.
Here are a few similar themed articles that can elaborate on this topic for other languages and processor architectures:
- https://zyedidia.github.io/blog/posts/1-d-baremetal/ - Writing a bare-metal RISC-V application in D
- https://florian.noeding.com/posts/risc-v-toy-cpu/cpu-from-scratch/ - How a CPU works: Bare metal C on my RISC-V toy CPU
- https://interrupt.memfault.com/blog/zero-to-main-1 - From Zero to main(): Bare metal C (For ARM)
- A Baremetal Introduction using C++ - Bare-metal for RISC-V from a C++ perspective.
The Normal Way
This sort of code normally is found in low-level support libraries from your a chip or processor vendor. For ARM Cortex-M cores the CMSIS library can be used, or for RISC-V SiFive provide their Freedom Metal Library is one example. In these libraries most source code is assembler, such as startup_ARMCM0.S or RISC-V entry.S. If those are applicable for your project, I would recommend using them!
A Baremetal Introduction using C++. Conclusion.
June 24, 2021 (updated: December 27, 2025) (baremetal,C++)
This is the last post in the series.
This post is a draft for Medium.
Is it possible to write pure modern C++ baremetal firmware from ground up for RISC-V?
The answer is a qualified yes.
- The toolchain using Platform IO supported modern C++ with a small configuration change.
- The startup code required some assembly, but was mostly was very readable C++.
- Drivers accessed via MMIO could be completely abstracted — or wrapped to simply provide convenient access to hardware registers.
- We could specify system clock delays in human-readable units with zero run time cost.
- Access to special system registers could be abstracted, and I propose we can abstract standard and custom instructions via C++ to take full advantage of RISC-V.
- Interrupts were not so simple, while we can use them as C++ lambda’s it’s not a zero-cost abstraction and the implementation was not straightforward. However, the plain old C callback works fine here.
C++ Benefits?
How useful is C++ at this level? Zero cost abstractions can be built to make software development simpler, more efficient, and also easier to verify.
- Object oriented abstractions can be made more efficient than traditional C abstractions via static polymorphism and compile-time evaluation (constexpr/consteval).
- The same object oriented abstractions can also simplify verification by making interfaces interchangeable, which can simplify unit testing and mock interfaces. For example, we could replace the timer driver with a host emulation version. We could even replace the MMIO and system register classes with a mock and run all this code via host emulation. Static assertions and other compile-time evaluation can check interfaces at compile-time.
C++ Downsides?
On to the downsides, the standard library is not specialized for resource-constrained environments and without a host operating system. The full features of the language are not available, and while the freestanding subset has been defined as a subset of the standard hosted implementation, it is still a work in progress.
C++ has become very complex, so the learning curve is higher, and there is a greater chance of making mistakes that are hidden by abstraction and language complexity. The impact of such mistakes is greater in the resource-constrained and often safety-critical environment of embedded systems compared to hosted software. Coding guidelines should be used.
RISC-V Downsides?
RISC-V is not specifically designed for embedded systems, the ARM Cortex-M series provides a better standard interrupt controller and standardized address layout for core peripherals such as the timer and interrupt controller.
The architecture is not yet available in a lot of general-purpose microcontrollers, so at the moment is reserved mostly for custom SoCs and FPGA implementations.
RISC-V Future?
RISC-V provides an open architecture to replace older proprietary cores. It probably won’t replace ARM Cortex- — a set of modern architectures designed for embedded and mobile systems — any time soon. But in applications where custom and legacy cores, even as old as the 8051, still find use, I expect we will see it take hold. It should benefit from a readily available set of core IPs with different pricing models, maturing toolchains with investment from many companies using an open development model.
As an open architecture, we can also expect RISC-V will enable new innovation. This is by lowering the barrier to entry for extending the processor and integrating peripherals, such as accelerators, with the processor core. In the data center, the open development of Linux has allowed companies to optimize the operating system layer to their business. Perhaps RISC-V will allow them to take that optimization down a further layer.

A Baremetal Introduction using C++. Interrupt Handling.
May 06, 2021 (updated: December 27, 2025) (baremetal,C++,interrupts)
What are the basics of interrupt handing in RISC-V? Can we utilize modern C++ to simplify the interrupt handling?
This post is a draft for Medium.
This is the seventh post in a series. This post is about RISC-V interrupt handling in C++.
RISC-V Machine Mode Interrupts
The RISC-V ISA is not specialized for embedded applications (when compared to an ISA such as the ARM Cortex-M). Keeping this in mind, the core ISA interrupt handing is limited — an interrupt controller is not in the core ISA specification.
What do we have in the base ISA? A timer, an external interrupt and a
software interrupt (mti, mei, msi). These are defined in machine
level ISA standard machine mode interrupt
registers.
For the example used in these posts we just need the timer interrupt, mti, which is included in the core ISA.

For a simple embedded application platform-specific machine-level
interrupt sources can extend the mip and mie registers to gain
more interrupts without an external interrupt controller. This allows for 16 additional inputs for a 32-bit base ISA.
However, it is expected most cores would be integrated with an
external interrupt controller. The SiFive target device uses the PLIC
(Platform Local Interrupt
Controller)
which connects to the mei external interrupt.
C++ Callbacks
An interrupt is an asynchronous event. What do we do in C++ when an asynchronous event occurs?
In modern C++ it is common to associate a lambda function with an event and execute the function when the event occurs. There are several advantages of lambda functions. The advantages I consider important are code locality, and the ability to store state easily.
Can we register a C++ lambda function as an interrupt handier?
In Part1 we saw a lambda function declared such as this:
    static const auto handler = [&] (void)
        {
            auto this_cause = riscv::csrs.mcause.read();
            // ...more code...
        }
This is a bit of syntactic sugar. The compiler will define an object to capture the caller’s context and a callback method to execute the lambda function body.
So can we take a pointer to this callback method and save it as an interrupt vector? No, for a few reasons:
- A RISC-V interrupt handler must have a specific prologue to save context to the stack, and epilogue to restore the stack and return via
mret, unlike ARM Cortex-M, but like most ISAs, interrupts are not standard C functions. - A RISC-V interrupt handler has alignment requirements.
- The C++ callback from the lambda function needs to be called as a method of a C++ object.
Installing an Interrupt Handler with GCC
We need to use some GCC compiler extensions when declaring functions used as interrupt handlers. These use attributes and pragmas to achieve the first two requirements above.
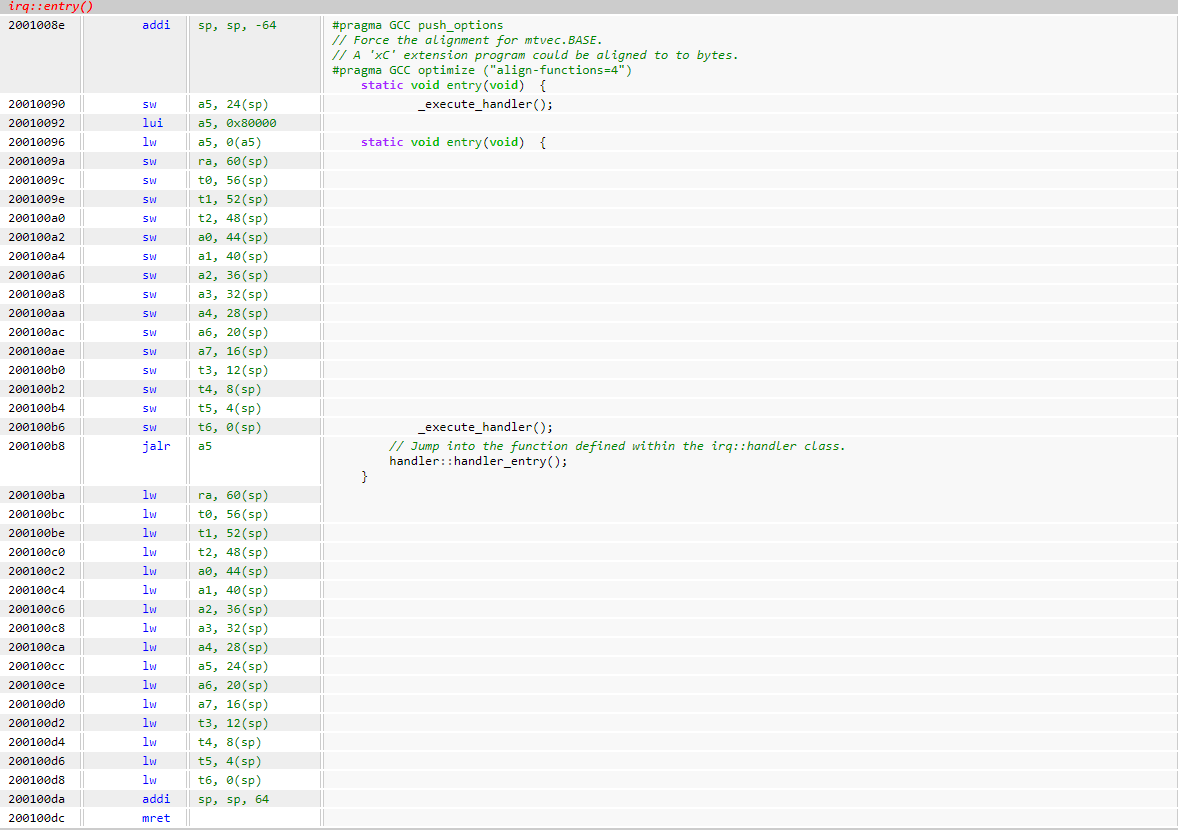
namespace irq {
    static void entry(void) __attribute__ ((interrupt ("machine")));
#pragma GCC push_options
// Force the alignment for mtvec.BASE.
#pragma GCC optimize ("align-functions=4")
    static void entry(void)  {
        // Jump into the function defined within the irq::handler class.
        handler::handler_entry();
    }
#pragma GCC pop_options
}
That is not pretty, but we now have a function address we can load to
the interrupt vector register. On RISC-V that’s a machine mode
register
mtvec.
riscv::csrs.mtvec.write(reinterpret_cast<std::uintptr_t>(irq::entry) );
Trampoline into C++
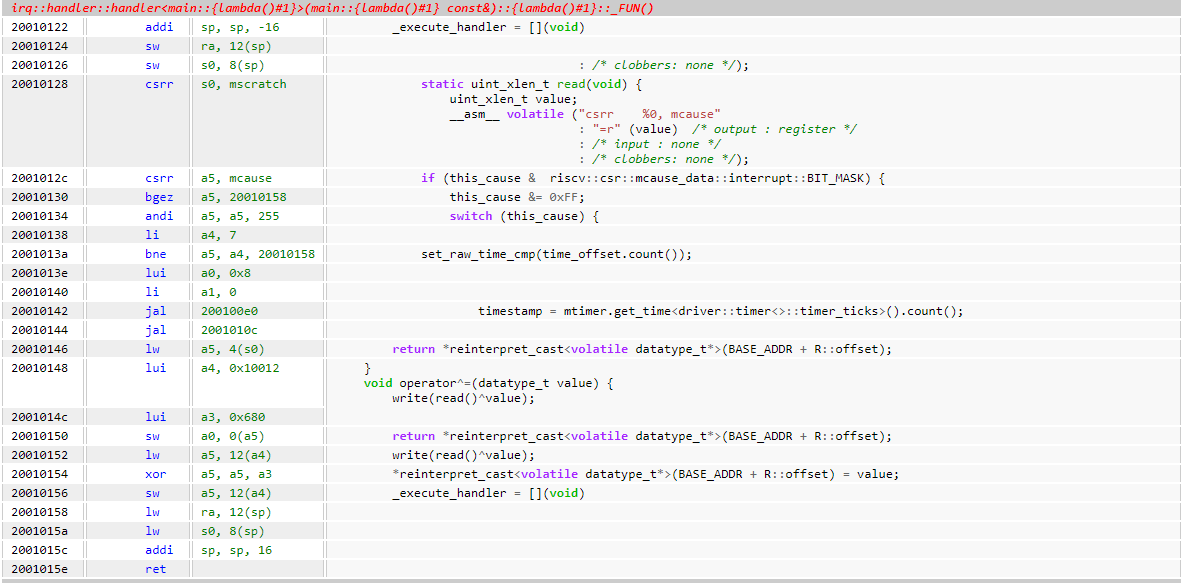
But how does this reach our lambda function? There is some need for C++ tricks and an optional RISC-V trick. We need to extract the function object context of the lambda function, we need to store it somewhere for the raw interrupt handler to use, and we need to call the lambda as a method of that object.
- To store context for an the IRQ handler, we can use
another machine mode register
mscratch, although a global variable could also have been used. - To extract the lambda function object context, a
templated function is used to access the generated lambda functor
type. It’s important not to use
std::functionhere, asstd::functionmakes use of the heap.
The flow is:
- Create a static function
irq::handler_entry()that calls an inlined static member_execute_handler. - Assign
_execute_handlerto an intermediatevoid(*)(void)lambda function declared in theirq::handlerconstructor. - Save a pointer to the handler’s functor object in
the
mscratchregister. - The intermediate
_execute_handlerlambda reads back the functor object pointer frommscratchand callsoperator()on the pointer to the lambda functor object. - The lambda function is invoked.
namespace irq {
    class handler {
    public:
        /** Create an IRQ handler class to install a
            function as the machine mode irq handler */
        template<class T> handler(T const &isr_handler);
        inline static void (*_execute_handler)(void);
        // Trampoline function is required to bridge from the entry point
        // function declared with specific attributes and alignments to this class member.
        friend void entry(void);
        /* Step 1 */
        static inline void handler_entry(void) {
            _execute_handler();
        }
    }

    template<class T> handler::handler(T const &isr_handler) {
        // This will call the C++ function object method that represents the lambda function above.
        // This is required to provide the context of the function call that is captured by the lambda.
        // A RISC-V optimization uses the MSCRATCH register to hold the function object context pointer.
        /* Step 2 */
        _execute_handler = [](void)
            {
                // Read the context from the interrupt scratch register.
                /* Step 4 */
                uintptr_t isr_context = riscv::csrs.mscratch.read();
                // Call into the lambda function.
                /* Step 5 */
                return ((T *)isr_context)->operator()();
            };
        // Get a pointer to the IRQ context and save in the interrupt scratch register.
        uintptr_t isr_context = (uintptr_t)&isr_handler;
        /* Step 3 */
        riscv::csrs.mscratch.write( reinterpret_cast<std::uintptr_t>(isr_context) );
        // Write the entry() function to the mtvec register to install our IRQ handler.
        riscv::csrs.mtvec.write( reinterpret_cast<std::uintptr_t>(entry) );
    }
}
After doing all that we hope the optimizer has reduced this to a simple trampoline function.
Conclusion
Could we implement this in pure C++? No, but it’s close.
Does C++ add value here? It’s questionable.
- For the caller, we’ve now reduced an interrupt handler to a standard C++ event driven programming model. This will allow the global state to be removed and possibly extended to other programming models such as promise/future.
- But for the implementation, a traditional C callback would be much simpler to implement and understand. The C++ code to insert the handler is obfuscated and offers no abstraction.
This is the last technical post of the series, the next post is a conclusion.
The Disassembly
What happens when we compile the above? The interrupt service routine is below.
- It loads the
_execute_handlerfunction address from0x8000_0000intoa5. - Saves the register context on the stack.
- Calls
_execute_handlerby jumping (jalr) to the address ina5. - Restores the context from the stack.
- Executes
mretto exit the interrupt.
The _execute_handlerlambda function is below.
- The context can be seen to be read from
mscratchat0x2001_0128. - It’s clear that the
handlerlambda function has been inlined from when0x2001_012creads themcauseregister.
A Baremetal Introduction using C++. Machine Mode Timer.
May 05, 2021 (updated: December 27, 2025) (baremetal,C++,timer)
This is the sixth post in a
series,
about the RISC-V machine mode timer and timing keeping using the C++
std::chrono library.
This post is a draft for Medium.
How does RISC-V keep time? How can we perform a periodic task with no operating system?
You may take for granted that you can simply ask the operating system
to sleep and wake you up in a second. If have programmed bare-metal
systems, you’ll understand it’s not as straight forward as calling
sleep().
The Machine Level ISA Timer
The RISC-V machine level ISA defines a real-time counter. It is defined as two MMIO system registers mtime and mtimer .
To get an interrupt one second from now, you simply need to set
mtimecmp to mtime + 1 second.
The programming model is quite simple - when mtimecmp >= mtime you
get an mti interrupt. The mtime register is counter that increases
monotonically - forever. The mtimecmp is continously compared to
it. As both registers are 64 bits there is no concern about overflow.
While most system registers are accessed via special instructions
mtime and mtimecmp, are accessed via MMIO (memory mapped IO). This is
because the mtime register depends on a global real-time clock and may
need to be placed on a bus shared by many cores.
There is one remaining question, how do we know what 1-second
corresponds to in mtime counts?
Timekeeping in Modern C++
Modern C++ includes the
std::chrono library, and
std::chrono::literals that allow us to think in terms of human time,
not machine time. For embedded systems, time is a first order concern so it is great that C++ makes it a standard part of the language.
Can we have a driver that simply lets as program “give me an interrupt in one second”?
Let’s look at the driver timer.hpp. We can start by definining the period of the mtime clock in C++ terms, via std::chrono::duration. This is a template as the mtime clock
period is defined by the implementation. (For a SiFive device we can
find the clock period and other parameters in the BSP device
tree.)
The driver::timer::timer_ticks declaration is the period of mtime. It defines the period as a ratio.
namespace driver {
    struct default_timer_config {
        static constexpr unsigned int MTIME_FREQ_HZ=32768;
    };
    template<class CONFIG=default_timer_config> class timer {
        /** Duration of each timer tick */
        using timer_ticks = std::chrono::duration<int, std::ratio<1, CONFIG::MTIME_FREQ_HZ>>;
    }
}
Next, how can we convert these timer ticks to another time base? std::chrono::duration_cast does the job. std::chrono::duration_cast<timer_ticks>(time_offset)
ratio of the number of seconds to clocks in one second.
If we have a timer value from mtime and want to convert to microseconds, then we use:
uint64_t value_from_mtime = ...;
auto value_in_ms = std::chrono::duration_cast<std::chrono::microseconds>( driver::timer::timer_ticks(value_from_mtime) );
Alternatively to convert from microseconds to a hardware timer value for mtimecmp then we use:
auto time_offset = std::chrono::microseconds(???);
uint64_t  value_of_mtimecmp = std::chrono::duration_cast<timer_ticks>(time_offset).count();
It’s all computed at compile-time, so no run-time cost is incurred.
Reading/Writing MMIO Registers in C++
There is not much difference between accessing MMIO registers in C, and C++. One advantage C++ has is templates. As RISC-V’s timer registers are not at a fixed address (absolute or relative to each other), re-usable code should be parameterized. Here that is done via template parameters.
struct mtimer_address_spec {
        static constexpr std::uintptr_t MTIMECMP_ADDR = 0x2000000 + 0x4000;
        static constexpr std::uintptr_t MTIME_ADDR = 0x2000000 + 0xBFF8;
};

template<class ADDRESS_SPEC=mtimer_address_spec>
void set_raw_time_cmp(uint64_t clock_offset) {
   // Single bus access
   auto mtimecmp = reinterpret_cast<volatile std::uint64_t *>(ADDRESS_SPEC::MTIMECMP_ADDR);
   *mtimecmp =  *mtimecmp + clock_offset;
}
In C we could use a structure to define the location of each register with a run time cost, or a set of pre-processor macros to make this zero-cost, however, in C++ we can pass a structure via a template parameter at zero cost.
Conclusion
The timer driver covers a few core topics in bare-metal programming and how C++ can provide an advantage.
- MMIO access and static polymorphism.
- Hardware real-time clocks.
- Converting clock frequencies and periods to human-readable units.
- Configuring drivers via templates and
constexpr.
The next post will look at handling interrupts.
64 Bit Registers Access on a 32 Bit Bus.
There is a small complication accessing timer registers, they are 64 bits wide and time tends to update constantly while our program is executing. On a 32 bit system we can only access 1/2 of the register at a time.
Imagine this sequence.
- The
mtimeis0x0000_0000_FFFF_FFFF. - We read the top 32 bits,
0x0000_0000 - We save this into our register t0.
- The real time clock ticks.
- The
mtimeis0x0000_0001_0000_0000. - We read the bottom 32 bits, 0x0000_0000.
- We save this into our register t1.
- We check the time in t0:t1, it’s 0x0000_0000_0000_0000!
This is one of the problems with bare-metal programing, we are communicating with hardware devices that are operating asynchronous to us, and can mess with out address space at will.
What can we do to deal with this? The upper bytes in mtime are very
unlikely to change from read to read, so we can loop while there is a
difference between reads. As the variable is marked volatile the
compiler knows to keep reading it from “memory” each time. (The one acceptable use of volatile in C++…)
auto mtimel = reinterpret_cast<volatile std::uint32_t *>(ADDRESS_SPEC::MTIME_ADDR);
auto mtimeh = reinterpret_cast<volatile std::uint32_t *>(ADDRESS_SPEC::MTIME_ADDR+4);
uint32_t mtimeh_val;
uint32_t mtimel_val;
do {
    // There is a small risk the mtimeh will tick over after reading mtimel
    mtimeh_val = *mtimeh;
    mtimel_val = *mtimel;
    // Poll mtimeh to ensure it's consistent after reading mtimel
    // The frequency of mtimeh ticking over is low
} while (mtimeh_val != *mtimeh);
return (static_cast<std::uint64_t>(mtimeh_val)<<32)|mtimel_val;
There are similar issues writing to mtimecmp that can cause spurious interrupts. Fortunately the RISC-V spec gives us an example of the code required
to avoid this
issue….. in
RISC-V assembly.
A Baremetal Introduction using C++. System Registers.
May 03, 2021 (updated: December 27, 2025) (baremetal,C++,csr)
What are system registers in RISC-V? How can we access them with modern C++?
System registers require special instructions to access, so unlike memory mapped registers (MMIO) we can’t just cast a pointer to memory to get access them in C++.
This post is a draft for Medium.
This is the fifth post in a series.
Do we need to embed inline assembly in our code, destroying the flow of our clean C++? No, with some abstraction we can write code like this:
auto this_cause = riscv::csrs.mcause.read();
riscv::csrs.mie.mti.set();
riscv::csrs.mtvec.write( reinterpret_cast<std::uintptr_t>(irq_vector));
RISC-V Special Instructions and C++
How does the above code generate custom instructions? The
riscv-csr.hpp
header provides the abstractions. That’s a huge file, but it is
generated
from a much more compact template file
templates/riscv-csr.hpp.
To understand how it works lets look at how just one system register, such as
mtvec
, can be written. The csrw instruction will write to the register, and
the assembler can recognize mtvec and encode it to register number 0x0305.
GCC inline assembler is required, but we can hide it within a static inline method of a struct.
namespace riscv {
    namespace csr {
#if __riscv_xlen==32
        using uint_xlen_t  = std::uint32_t;
#elif __riscv_xlen==64
        using uint_xlen_t  = std::uint64_t;
#endif
        struct mtvec_ops  {
            using datatype = uint_xlen_t;
            static constexpr priv_t priv = MRW;
            static void write(uint_xlen_t value) {
                __asm__ volatile ("csrw    mtvec, %0"
                                  : /* output: none */
                                  : "r" (value) /* input : from register */
                                  : /* clobbers: none */);
            }
        }
    }
}
The function above is fine, and we could use it as-is, but it’s not
very C++-ish (modern or classic), and it will get messy once we try and write
immediate values, or do atomic write to bitfields in CSRs. (Those have
their own instructions such as csrwi and csrrw).
You may have seen the function was declared with a generic name
write(), and not mtvec_write() or something specialized. Instead
the target system register was scoped was provided by traits like structure
mtvec_ops {} .
This will enable us to do some some generic programming. We can
achieve that by declaring similar structs with methods of the same
name, write(), for all special instructions. Then we use the
structure as a template parameter to a generic register access class,
such as read_write_reg.
Finally, this templated class read_write_reg<mtvec_ops> can be
aliased via using and we can give it a simple name, such as
mtvec_reg.
For simplicity the whole read_write_reg class is not shown here,
just the write function and instantiation.
namespace riscv {
    namespace csr {
        template<class C> class read_write_reg {
        public :
            using write_datatype_t = typename C::datatype;
            /** Write to the CSR. */
            inline void write(const write_datatype_t value) {
                C::write(value);
            }
        };
        // Instantiate the read_write_reg class with the mtvec operations
        using mtvec_reg = read_write_reg<mtvec_ops>;
        // ...
        struct all {
           riscv::csr::mtvec_reg mtvec;
        }
    } /* csr */
    static csr::all csrs;
} /* riscv */
We can now write to the interrupt vector in clean C++ code.
riscv::csrs.mtvec.write( reinterpret_cast<std::uintptr_t>(entry));
RISC-V CSRs and Bit Level Access
You’ve now seen how mtvec.write( ...); works. How about accessing fields?
RISC-V has a set of atomic read and write or set/clear bits instructions. These can be used to modify fields of system registers.
As you would expect, with the same method as above C++ can abstract
those instructions. Using constexpr we can use compile time
conditional code to select instructions.
namespace riscv {
    namespace csr {
        struct mie_ops  {
            /** Atomic modify and set bits for mie */
            static void set_bits(uint_xlen_t mask) {
                __asm__ volatile ("csrrs    zero, mie, %0"
                                  : /* output: none */
                                  : "r" (mask)  /* input : register */
                                  : /* clobbers: none */);
            }
            /** Atomic modify and set bits from immediate for mie */
            static void set_bits_imm(const uint8_t mask) {
                __asm__ volatile ("csrrsi    zero, mie, %0"
                                  : /* output: none */
                                  : "i" (mask)  /* input : register */
                                  : /* clobbers: none */);
            }
        }; /* mie_ops */
        template<class C, class F> class read_write_field {
        public:
            inline void set(void) {
                if constexpr ((F::BIT_MASK & CSR_IMM_OP_MASK) == F::BIT_MASK) {
                    C::set_bits_imm(F::BIT_MASK);
                } else {
                    C::set_bits(F::BIT_MASK);
                }
            }
        };
        /* Machine Status */
        template<class OPS> class mstatus_reg : public read_write_reg<OPS>
        {
            public:
                read_write_field<OPS, riscv::csr::mstatus_data::mie> mie;
        };
        using mstatus = mstatus_reg<riscv::csr::mstatus_ops>;;
    } /* csr */

} /* riscv */
While that is very verbose, it is easy to generate. We can now enable the interrupt vector in clean C++ code.
// Global interrupt enable
riscv::csrs.mstatus.mie.set();
Conclusion
So were we able to do this in pure C++? Yes, completely. In fact, using C++ has opened up programmable compile time optimizations implemented at the instruction level that would not be possible in C.
As for RISC-V? Another topic that can be explored using this method is custom instruction extensions. I will explore that later.
The next post will explore the machine mode timer.
A Baremetal Introduction using C++. Startup.
May 03, 2021 (updated: December 27, 2025) (baremetal,C++,startup)
In the last post, we set up the development environment. This post is about how the RISC-V core executes our program.
How do we go from reset to entering the main() function in C++ in
RISC-V? Startup code is generally not something you need to worry about,
however, it is of interest when bringing up a device from scratch.
This post is a draft for Medium.
Can we write our own startup code in pure C++?
Booting a RISC-V Core
Let’s start by looking at the RISC-V specifics needed to boot. This is where the software starts executing.
-
Where does the execution start at reset?
RISC-V does not define a standard entry point or reset vector. For SiFive’s core we can locate the entry code in the linker section
.text.metal.init.enter, but this will change for other RISC-V cores. -
How is the stack created?
The stack pointer
spneeds to be initialized manually with a move (Unlike the Cortex-M). The linker script defines a global symbol_spfor the top of the stack, and reserves__stack_sizebelow it. -
Do any other registers need to be initialized?
The linker relaxation optimization for RISC-V requires the global pointer
gpto be configured with a location,_global_pointer$, from the linker script. This is used to optimize access to global variables. (see this post for more details) -
What about multi-core startup?
RISC-V has a concept of a hart to represent each execution context (For example hardware threads and cores.). This example will only work with one hart.
You can see these specifics handled in the small function below using inline assembly.
extern "C" void _enter(void)  __attribute__ ((naked, section(".text.metal.init.enter")));
extern "C" void _start(void) __attribute__ ((noreturn));
void _enter(void)   {
    // Setup SP and GP
    // The locations are defined in the linker script
    __asm__ volatile  (
                      ".option push;"
                      ".option norelax;"
                      "la    gp, __global_pointer$;"
                      ".option pop;"
                      "la    sp, _sp;"
                      "jal   zero, _start;"
                      :  /* output: none %0 */
                      : /* input: none */
                      : /* clobbers: none */);
    // This point will not be executed, _start() will be called with no return.
}
A few details:
- The
spandgpare aliases to general=purpose registers and these are defined by the ABI and code generation conventions. - The
zeroregister is an alias tor0, however, this is defined as constant 0 by the hardware specification, not just by convention. - The
lainstruction is a pseudo instruction for loading addresses.
Initializing the C++ World
The enter() function was pure assembly, when do we get to use C++ as promised?
Once we reach the start() function we can use SOME C++, we have a
stack so we can use local variables. Anything that does not use the heap, globals
or rely on static initialization should be available. In this case we
can use the std::fill, std::copy and std::for_each functions
from the <algorithm> header.
What needs to be initialized? The SRAM at reset has no defined value,
any globals will be in an undefined state. To initialize them the
value is either cleared to zero (.bss), or comes from a default value stored
in the program image (.data), or from an initialization function (constructors).
extern "C" std::uint8_t metal_segment_bss_target_start, metal_segment_bss_target_end, metal_segment_data_source_start .. metal_segment_itim_target_end;
extern "C" function_t __init_array_start, __init_array_end;
// At this point we have a stack and global pointer, but no access to global variables.
void _start(void) {
    // Init memory regions
    // Clear the .bss section (global variables with no initial values)
    std::fill(&metal_segment_bss_target_start, // cppcheck-suppress mismatchingContainers
              &metal_segment_bss_target_end,
              0U);
    // Initialize the .data section (global variables with initial values)
    std::copy(&metal_segment_data_source_start, // cppcheck-suppress mismatchingContainers
              &metal_segment_data_source_start + (&metal_segment_data_target_end-&metal_segment_data_target_start),
              &metal_segment_data_target_start);
    // Initialize the .itim section (code moved from flash to SRAM to improve performance)
    std::copy(&metal_segment_itim_source_start, // cppcheck-suppress mismatchingContainers
              &metal_segment_itim_source_start + (&metal_segment_itim_target_end - &metal_segment_itim_target_start),
              &metal_segment_itim_target_start);
    // Call constructors
    std::for_each( &__init_array_start,
                   &__init_array_end,
                   [](function_t pf) {(pf)();});
    // Jump to main
    auto rc = main();
    // Don't expect to return, if so busy loop in the exit function.
    _Exit(rc);
}
What is happening above? It’s initialing the regions of memory for the C++ program. The linker script has defined the locations, but we need to initialize the SRAM which is in an undefined state at startup.
- The linker script used here is from the Freedom E-SDK. Any variable named
metal_*or__init_*is defined in the linker script. - The
bssregion contains global variables with no initial value. The SRAM allocated to these variables is cleared to 0. - The
datasection contains global variables with initial values. These values are copied from read-only memory (FLASH/ROM) to SRAM. - The
itimsection is a code section that is to be moved to SRAM to improve performance. - The
initarray is a table of constructor function pointers to construct global variables.
Conclusion
This is the absolute bare minimum needed to run a program, but from here we can call main() and start the program.
Could we implement the startup routines in pure C++? Not at all, but we have benefited from the abstraction of C++.
The complete source code is here
The next post will look at RISC-V system registers and how to use C++ to abstract special instructions.
This C++ start-up code is based on examples in chapter 8 of Christopher Kormanyos’s Real Time C++. His code examples for AVR, ARM, Renesas etc are on github. He shows we can implement most of the code in C++.
A Baremetal Introduction using C++. Development Environment
April 30, 2021 (updated: December 27, 2025) (baremetal,C++,toolchain)
For this series of posts, my platform is a SiFive HiFive1 Rev B development board. It’s equipped with a 320MHz RV32IMAC (FE310 core). For software build and debug the choice is Platform IO, an IDE integrated into VS Code.
This post is a draft for Medium.
Following on from Part 2, how do we compile this project and run it?
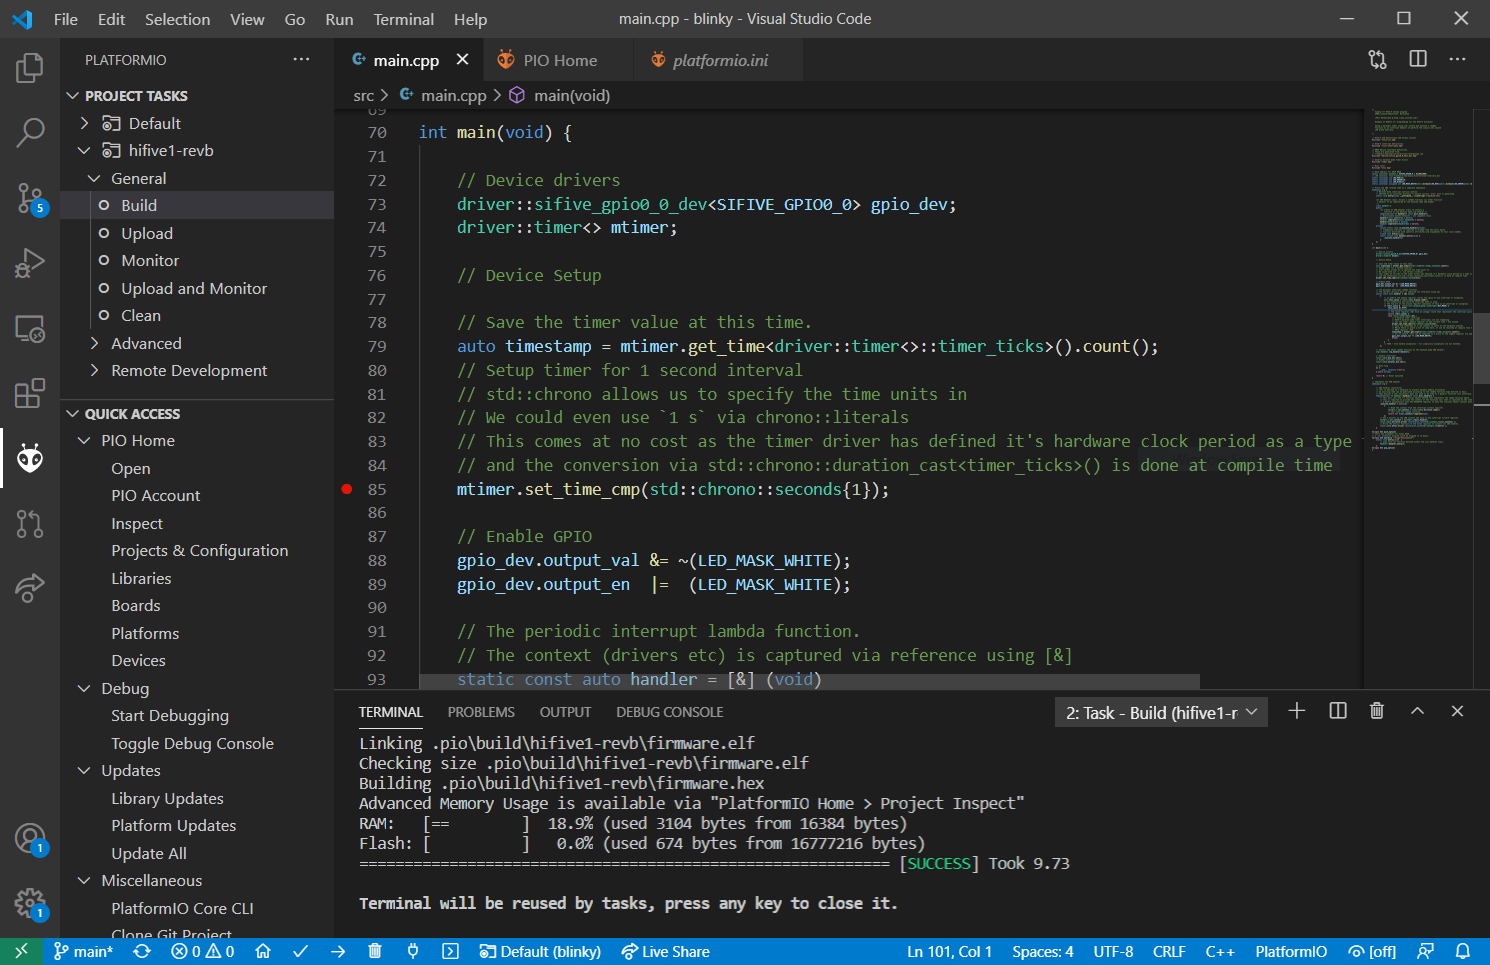
Setup
To setup up a new project in Platform IO just select the board, framework and path for the files. For this exercise the choices are HiFive1 Rev B, Freedom E SDK and a custom path. We need to do this to configure our C++ version and baremetal environment.
In this example platformio.ini’s build_flags has been extended with
options to target embedded C++17. In particular:
-nostartfilesis used as this example includes a custom startup routine,-std=c++17for all the needed modern C++ features, and-fno-threadsafe-staticsto prevent threadsafe code being emitted (these ensure static declarations are initialized only once).
The configuration build_flags captures compiler, pre-processor and linker options, so -Wl,-Map,blinky.map
to generate a map file can be added here along side compiler options.
The complete set of build flags used is here:
build_flags =
    -std=c++17
    -O2
    -g
    -Wall
    -ffunction-sections
    -fno-exceptions
    -fno-rtti
    -fno-nonansi-builtins
    -fno-use-cxa-atexit
    -fno-threadsafe-statics
    -nostartfiles
    -Wl,-Map,blinky.map
That configuration is all we need to build this project.
Adding a Post Compile Action
For this exercise, we’ll want to check exactly how the compiler is transforming our C++ code. Disassembling the output will show us that.
How can Platform IO do this? We need to edit platform.ini again, this
time adding a helper script and additional targets.
extra_scripts = post_build.py
targets = disasm
The build system behind Platform IO is Scons. This is a Python-based system, so the post build script is a python file.
The Scons environment is used to find the path to the output file,
${BUILD_DIR}/${PROGNAME}.elf, and the toolchain objdump is found by
modifying the path to${OBJDUMP}. The env.subst() will expand the
environment variables, and env.Execute() will run the command.
def after_build(source, target, env):
    """ Run objdump on the target elf file and save the output in the top dir.
    """
    objdump=env.subst("${OBJCOPY}").replace("objcopy","objdump")
    src_elf=env.subst("${BUILD_DIR}/${PROGNAME}.elf")
    cmd=" ".join([
        objdump, "-SC","--file-start-context", "-w",
        src_elf,">","${PROGNAME}.disasm"]) #
    env.Execute(cmd)
The target is given a name disasm via the
env.AddCustomTarget()
method. This ties into the platformio.ini option targets = disasm
above.
Import("env")

env.AddCustomTarget(
    "disasm",
    "${BUILD_DIR}/${PROGNAME}.elf",
    after_build,
    title="Disasm 2",
    description="Generate a disassembly file on demand",
    always_build=True
)
The above is all that is needed to compile the project. Loading it is simple, Platform IO takes care of it.
The project for this example is here. You should be able to load this project with Platform IO and try it out. With some small modifications, it should work on any other toolchain, IDE, or target.
The next post looks at how the core starts from reset and executes the program.
The rest of this post will look at other development environments and target platform options.
Other C++ Development Environments
These posts use PlaformIO as it’s a great way to get started with no messing around, but let’s explore a few other options that are available.
The standard toolchain for RISC-V is GCC, although LLVM RISC-V support is also available. Platform IO will automatically install SiFive’s toolchain and SDK.
However, if like me your usual preference is command line oriented, then use of the command line tools with Make or CMake maybe your choice.
- The toolchain binaries used by GNU MCU Eclipse can be installed independently via xpack riscv-none-embed-gcc.
- CMake with a RISC-V toolchain is possible.
- For complete toolchain control, GCC and supporting libraries can be downloaded and compiled easily via the github riscv-gnu-toolchain project. This is useful for those looking for bleeding edge extension support, or to change variant that the default C libraries are compiled for. (For example, In the past I have used this option to target an RV32EC core before pre-compiled binaries were available.)
If you are like most developers, an IDE maybe your choice.
- SiFive, like most processor vendors, has a GCC and Eclipse based IDE, the Freedom Studio.
- For a vendor independent path GNU MCU Eclipse supports RISC-V compilation and debugging very well. I have personally used this to target proprietary RISC-V cores and simulators with success.
The IDEs above all use OpenOCD for debug support, and this can be downloaded and compiled from OpenOCD source on github, or binaries are available from xpack.
Other RISC-V Devices
These posts target SiFive’s HiFive1 Rev B as it’s easily available and easy to use. However, the point of programming RISC-V at this low level is to make use of the open architecture to build bigger custom systems. As I’ve been on the firmware side this list is not complete, but just a starting point:
The main IP vendors seems to be:
- SiFive. SiFive has a heritage from the original Berkeley RocketChip implementation.
- Andes Technology is a another major RISC-V processor IP vendor, found in designs such as MicroChips’s PolarFire SoC.
As RISC-V is an open architecture there are many other options.
- Professionally my experience has been with IQonIC Works RISC-V IP. The provide a small RV32EC cores targeted at deep embedded applications, where stripped down baremetal programming is essential.
- Many open source options.
The project for this example is here. You should be able to load this project with Platform IO and try it out. With some small modifications it should work on any other toolchain, IDE or target.
A Baremetal Introduction using C++. Overview.
April 30, 2021 (updated: December 27, 2025) (baremetal,C++)
As described in Part1, a simple C++ application to blink an LED, what does this look like with no operating system?
This post is a draft. Final version on Medium.
Blinky in C++
Here we have blinky on SiFive HiFive1 Rev B development board, built and loaded via Platform IO.

Let’s look at the program flow, and the C++ and RISC-V features used. All code here is C++. The drivers and startup routine not shown here are also C++.
(1) Instantiating the drivers for the timer and GPIO.
- RISC-V has a standard timer. However, there is no standard RISC-V GPIO. On this device, we use SiFive’s GPIO.
- The C++ drivers are using template parameters to configure the drivers for the hardware at compile time. Two methods are used here:
- For the timer, the template parameter is a trait, a struct that exists purely to isolate the implementation details. Both the address map and base clock frequency are parameterized as these are not standardized for RISC-V.
- For the GPIO we’re simply passing a value,
SIFIVE_GPIO0_0, as the base address of the device as a template parameter. - By using C++ templates there is no need to store those parameters in the instance, so these instantiations consume no resources.
        struct mtimer_address_spec {
            static constexpr std::uintptr_t MTIMECMP_ADDR = 0x20004000;
            static constexpr std::uintptr_t MTIME_ADDR    = 0x2000BFF8;
        };
        struct mtimer_timer_config {
            static constexpr unsigned int MTIME_FREQ_HZ=32768;
        };
        static constexpr uintptr_t SIFIVE_GPIO0_0 = 0x10012000;
        ...
        driver::timer<mtimer_address_spec, mtimer_timer_config> mtimer;
        driver::sifive_gpio0_0_dev<SIFIVE_GPIO0_0> gpio_dev;
(2) Initializing the timer.
- The timer is set to interrupt after a one-second
timeout. C++’s
std::chronois used to convert from human-readable time into hardware clocks behind the scenes at compile time. - RISC-V defines a standard machine mode timer with a compare and time counter register.
mtimer.set_time_cmp(std::chrono::seconds{1});
(3) Enable the GPIO.
- This driver is not hiding the hardware details, it simply exposes the registers.
- The pin assignment details are hidden with a
variable,
LED_MASK_WHITEdefined as a C++constexpr. Aconstexprhas zero runtime cost and allows us to avoid the issues of the C Pre-processor. Modern C++ has almost no need to use the C++ preprocessor.
        static constexpr int LED_RED=22;
        static constexpr int LED_GREEN=19;
        static constexpr int LED_BLUE=21;
        static constexpr unsigned int    LED_MASK_WHITE=
            bitmask(LED_RED)|bitmask(LED_GREEN)|bitmask(LED_BLUE);
        ...
        gpio_dev.output_val &= ~(LED_MASK_WHITE);
        gpio_dev.output_en  |=  (LED_MASK_WHITE);
(4) Declare an interrupt handler.
- RISC-V defines a standard system register for interrupt vector configuration.
- As this is modern C++ we can use a lambda function that avoids the need to share data between the interrupt and main function via globals.
- The lambda captures its context (that is the variables in the current scope) via references.
- The details of loading the lambda function are
hidden in the
irq_handlerclass’s templated constructor.
       static const auto handler = [&] (void)
            {
                auto this_cause = riscv::csrs.mcause.read();
                // ...more code...
            }
        irq::handler irq_handler(handler);
(5) Enable interrupts via system registers.
- The RISC-V defines system registers for the timer
interrupt (
mie.mti) and global interrupt (mstatus.mie) enables. - RISC-V system registers are accessed via special instructions, and these C++ statements will compile to those instructions.
- We can use a C++ class
riscv::csr::allinstantiated asriscv::csrsto provide an abstraction for the RISC-V system registers.
        #include "riscv-csr.hpp"
        ...
        riscv::csrs.mie.mti.set();
        riscv::csrs.mstatus.mie.set();
(6) Enter a busy loop and stay there.
- There is no C++ here, just the wait for interrupt instruction. More program logic and abstraction could be added here, but blinky does not need it.
        do {
            __asm__ volatile ("wfi");
        } while (true);
(7) Handle the timer interrupt.
- The interrupt handler reads the
mcausesystem register to de-multiplex the cause of the interrupt. - The RISC-V machine timer is not auto-reloading, so the handler must reload it.
- While this example uses a single IRQ handler, RISC-V supports both multiplexed and vectored interrupts.
- The GPIO
output_valbits are toggled to blink the LED. The register interface is simple, so no more abstraction is added.
    auto this_cause = riscv::csrs.mcause.read();
                if (this_cause &
                    riscv::csr::mcause_data::interrupt::BIT_MASK) {
                    this_cause &= 0xFF;
                    switch (this_cause) {
                    case riscv::interrupts::mti :
                        mtimer.set_time_cmp(std::chrono::seconds{1});
                        timestamp =
                            mtimer.get_time<
                               driver::timer<>::timer_ticks>().count();
                        gpio_dev.output_val ^= (LED_MASK_WHITE);
                        break;
                    }
                }
The Complete Example
Putting together the above steps we can write the main() function that
will set up a one-second timer and blink the LED.
    int main(void) {// Device drivers
        driver::sifive_gpio0_0_dev<SIFIVE_GPIO0_0> gpio_dev;
        driver::timer<> mtimer;    // Device Setup    // Save the timer value at this time.
        auto timestamp =
            mtimer.get_time<driver::timer<>::timer_ticks>().count();
        // Setup timer for 1 second interval
        mtimer.set_time_cmp(std::chrono::seconds{1});    // Enable GPIO
        gpio_dev.output_val &= ~(LED_MASK_WHITE);
        gpio_dev.output_en  |=  (LED_MASK_WHITE);    // The periodic interrupt lambda function.
        // The context (drivers etc) is captured via reference using [&]
        static const auto handler = [&] (void)
            {
                // In RISC-V the mcause register stores the
                // cause of any interrupt or exception.
                auto this_cause = riscv::csrs.mcause.read();
                // For simplicity non-vectored interrupt mode is used.
                // The top bit of the mcause register indicates
                // if this is an interrupt or exception.
                if (this_cause &
                         riscv::csr::mcause_data::interrupt::BIT_MASK) {
                    this_cause &= 0xFF;
                    // De-multiplex the interrupt
                    // The cause register LSBs hold an integer value
                    // that represents the interrupt source
                    switch (this_cause) {
                    case riscv::interrupts::mti :
                        // A machine timer interrupt
                        // RISC-V machine mode timer interrupts
                        // are not repeating.
                        // Set the timer compare register to the
                        // current time + one second
                        mtimer.set_time_cmp(std::chrono::seconds{1});
                        // Save the timestamp as a raw counter in
                        // units of the hardware counter.
                        // While there is quite a bit of code here,
                        // it can be resolved at compile time to a
                        // simple MMIO register read.
                        timestamp =
                             mtimer.get_time<
                                driver::timer<>::timer_ticks>().count();
                        // Xor to invert. This can be compiled to a
                        // write to the toggle register via
                        // operator overloading.
                        gpio_dev.output_val ^= (LED_MASK_WHITE);
                        break;
                    }
                }
            };    // Install the above lambda function as the machine mode
        // IRQ handler.
        irq::handler irq_handler(handler);    // Enable interrupts
        riscv::csrs.mie.mti.set();
        // Global interrupt enable
        riscv::csrs.mstatus.mie.set();    // Busy loop
        do {
            __asm__ volatile ("wfi");
        } while (true);    return 0; // Never executed
    }
Last Words
It’s compact C++ code but does not hide the operation of the hardware.
I hope this post has demonstrated the basics of a low-level program for the RISC-V and the capabilities of using modern C++ for efficient low-level programming.
Certainly, more abstraction could be used to hide details of the architecture and operation — but that would defeat some of the purpose of this example for learning RISC-V!
Feel free to try it out via the project on GitHub and read the next post to find out how to compile and load the project.
The next post describes the development environment for RISC-V C++.
A Baremetal Introduction using C++. Introduction.
April 30, 2021 (updated: December 27, 2025) (baremetal,C++)
This is a series of posts where I’d like to combine those topics for embedded systems programming. RISC-V and C++ have been evolving rapidly, and you will see modern C++ is a great way to explore RISC-V and develop embedded systems.
This post is a draft. Final version on Medium.
What does it look like to program with no operating system? Can we have direct access to hardware using a high-level language like C++? How does RISC-V work at the most stripped-back bare metal level?
Is it possible to write pure modern C++ bare-metal firmware from the ground up for RISC-V?
RISC-V?
RISC-V has been getting a lot of publicity as a new ISA that’s taking on the entrenched players such as ARM and x86–64. Realistically, RISC-V won’t be displacing ARM in the standard platforms of the embedded or mobile space or replacing x86–64 on the desktop or server space anytime soon.
However, that is not to say RISC-V won’t gain much traction. I believe openness in computer hardware will be a transformative technology, much like Linux has shown the power of an open operating system. Linux never directly displaced the applications of desktop computers, but it completely transformed mobile and cloud computing. There is a lot of room for this architecture in many embedded applications, and we will be seeing applications that benefit from the open architecture grow and thrive on this platform.

RISC-V combines the simplicity of a minimal core architecture (RV32E, RV32I and RV64I) with the ability to extended the architecture as required (e.g. _M_ultiply Instructions, _A_tomics, _C_ompressed instructions). Unlike, say the ARM Cortex-M, it is not designed for embedded systems, but the simplicity of machine mode and the RV32I/RV32E ISAs does suit embedded systems. This series of posts targets a RV32IMAC core.
As for my experience, a few years ago I was responsible for a firmware project for a custom SoC controlled by a small RISC-V RV32EC core. There was no room for an RTOS, so it was bare-metal. This was for an in-house RISC-V implementation, with in-house IP, and RISC-V was a new platform. It was a challenge, working out the details of this new architecture for such an embedded application.
I’d like to put back some of my knowledge related to RISC-V gained at that time in these posts. The knowledge can be applied to developing firmware for standard or custom RISC-V cores and SoCs.
Baremetal?
Bare-metal programming for RISC-V machine mode is the target of these posts. That is, there is no operating system, everything we do will interact directly with the hardware.
Where can bare-metal programming be used? I first developed a taste for it a long time ago, when coding games in m68k assembler and directly accessing video and audio hardware. Since then some examples of where I’ve used it professionally are:
- Verification and bring up of processor cores and peripherals.
- Porting and debugging RTOSes for new processors, SoCs.
- Deeply embedded firmware for USB-PD/USB Type-C and power conversion.
- Debugging embedded Linux boot-up and drivers.

Is it directly useful for everyday mainstream software development? Absolutely not! But does it help you understand the core skills of software development, Absolutely! I believe understanding the underlying hardware model of computing opens up a deep understanding of software.
Modern C++?
The evolution of C++ has unleashed a modern low overhead language. While far more complex than C, the traditional language of embedded systems, modern C++ can achieve a higher-level abstraction of programming, with less cost in terms of memory usage and instruction count. In this post, I’m targeting C++17 but will look to C++20 in later posts.
The content in these posts has been inspired by reading Real-Time C++: Efficient Object-Oriented and Template Microcontroller Programming, although I have my own differing opinions on how some code should be structured.
The example for this series of posts is the classic blinky program. I’d like to use it to explore a number of topics of RISC-V and C++. Each post will focus on different aspects of RISC-V and modern C++ for embedded systems. As it turns out, there is a lot of work to program firmware from scratch, this is the breakdown:
Part 1. This Intro.
- About RISC-V, bare-metal programming, and C++.
Part 2. main() Program overview
- What does a pure C++ application look like for embedded RISC-V?
Part 3. The Development Environment.
- Compiling, debugging, flashing to the RISC-V target.
- What target platform and toolchains are used for this exercise?
Part 4. Zero to main() for RISC-V, in (almost) pure C++
- How do RISC-V processors exit reset and set up the stack and global environment?
- How can we use the C++ algorithms library to simplify startup?
Part 5. The system registers of RISC-V and zero cost C++ abstractions.
- What do we need RISC-V system registers for? How can we access them?
- Can C++ hide the complexity of using special instructions?
Part 6. The RISC-V machine mode timer and timekeeping using the C++ std::chrono library.
- What does the standard RISC-V timer look like?
- How can we abstract timing using
std::chronoin C++? Can C++ access MMIO registers?
Part 7. The basics of RISC-V interrupt handling, and C++ lambda functions.
- What is the basic interrupt model or RISC-V?
- What is a C++ lambda function? Can they handle interrupts in C++?
Please read on to the next post to find out more.